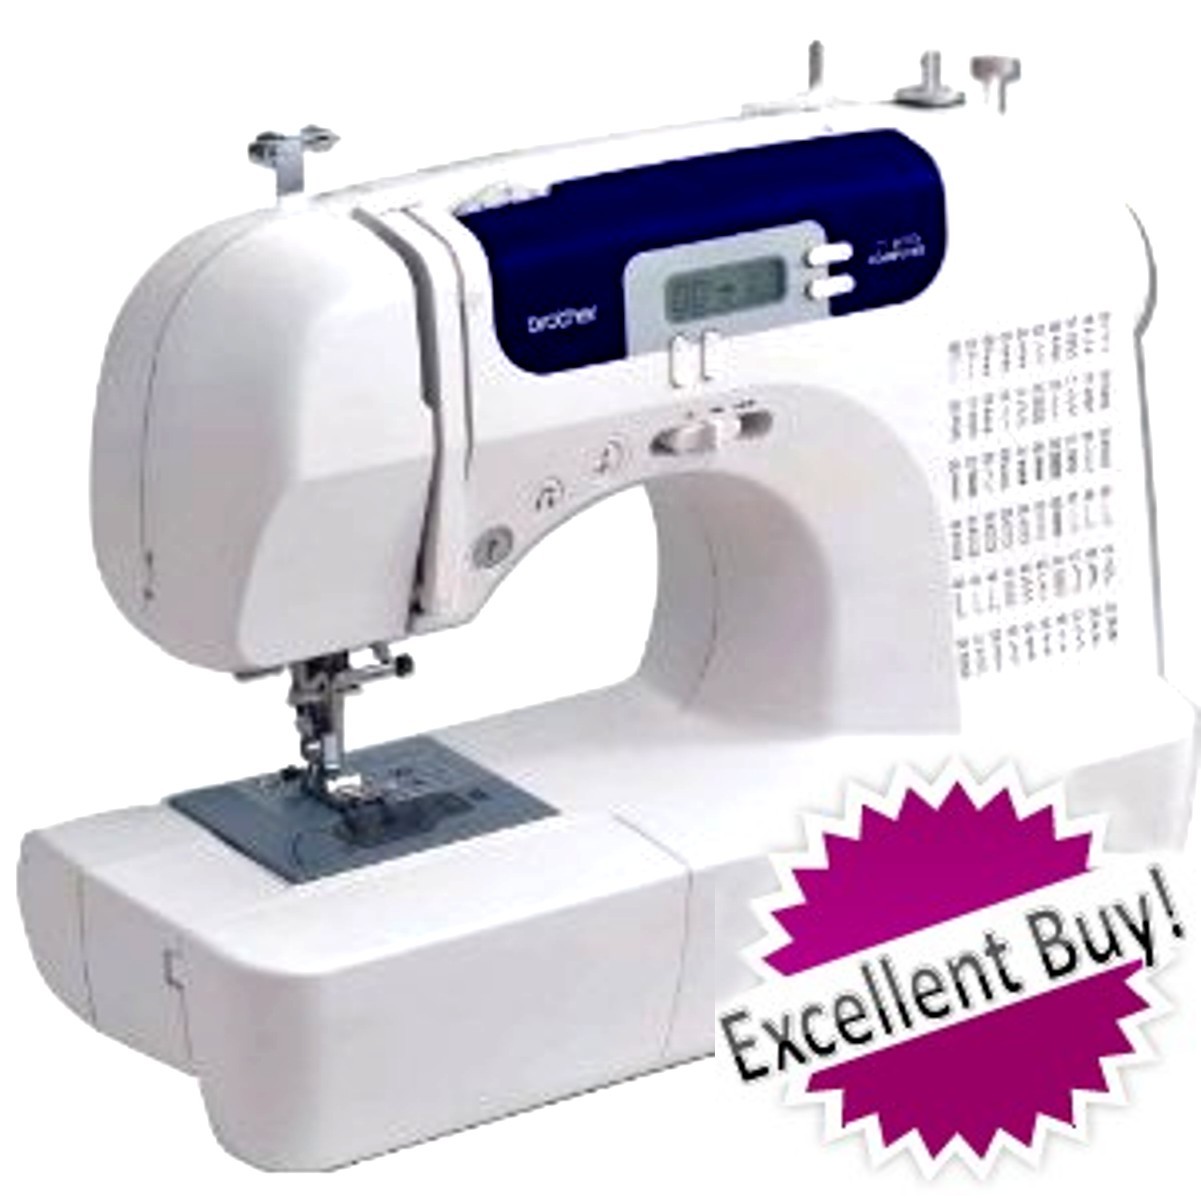
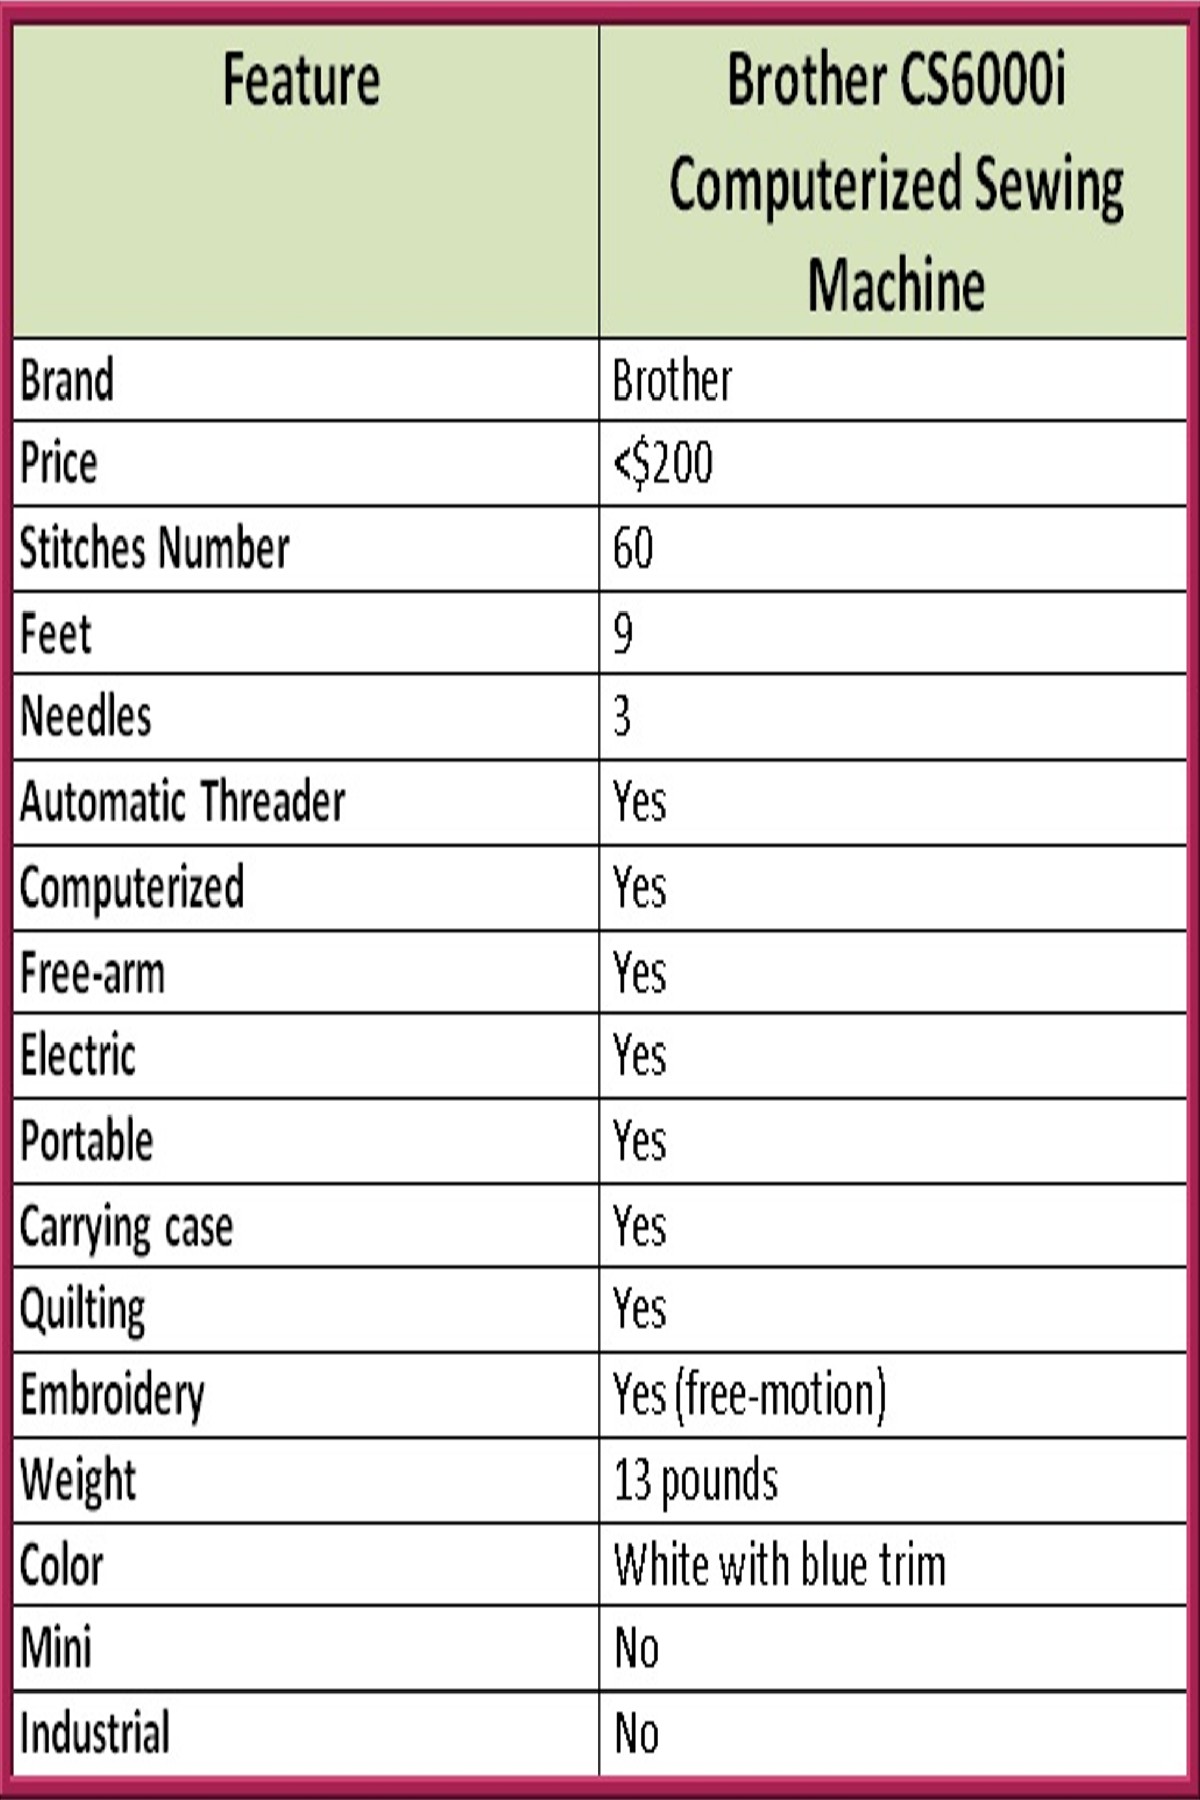
 The Brother CS6000i is hands down the best deal for under $200 and has high marks from beginners and experienced seamstresses alike. The combination of low price and loads of features makes it one of the best value buys on the market.
Users describe it as incredibly easy to learn with automation and throw in accessories that make it a bargain that’s almost too good to believe!
In comparison to other machines in this price range, it can’t be beat. If you want flexible sewing options and a low price, this model had better be on your list!
Table of Contents
(Click Ahead!)
Built In Stitches / Presser Feet / Features & Functionality / Operating Buttons & Controls / Video / Accessories / Optional Presser Feet / Price / Bobbins / Hard Cover Case / Beginners / Customer Reviews / Pros, Cons & Manual
REVIEW SUMMARY
MODEL: Brother CS600i Sewing Machine
REVIEWED BY: Erin
RATING: 4.5 
LAST UPDATED: April 10, 2015
COMPARE PRICES
Amazon
We believe that a good, quality sewing machine doesn’t have to cost a fortune. If you’re just starting out, why pay several hundred dollars if you don’t have to? This model proves you can get a lot of options for without spending a lot of money.
A quick glance reveals there’s automation built in that simply makes it easier to sew like a combination Start/Stop button with speed control so you don’t even need to use a foot pedal (although one is supplied). Most computerized models with features like these cost far more than this one does.
The stitch count and selection are fantastic, too. This isn’t a machine you’re going to outgrow anytime soon.
It easily accommodates quilting, comes with accessories that you’d have to buy separately with other machines, an automatic needle threader, twin needle sewing, an extra wide work table, and push button needle up or down control. Oh, and did I mention the hard cover? Included!
Stitches Cover Lots of Project Types
(Back to Top)
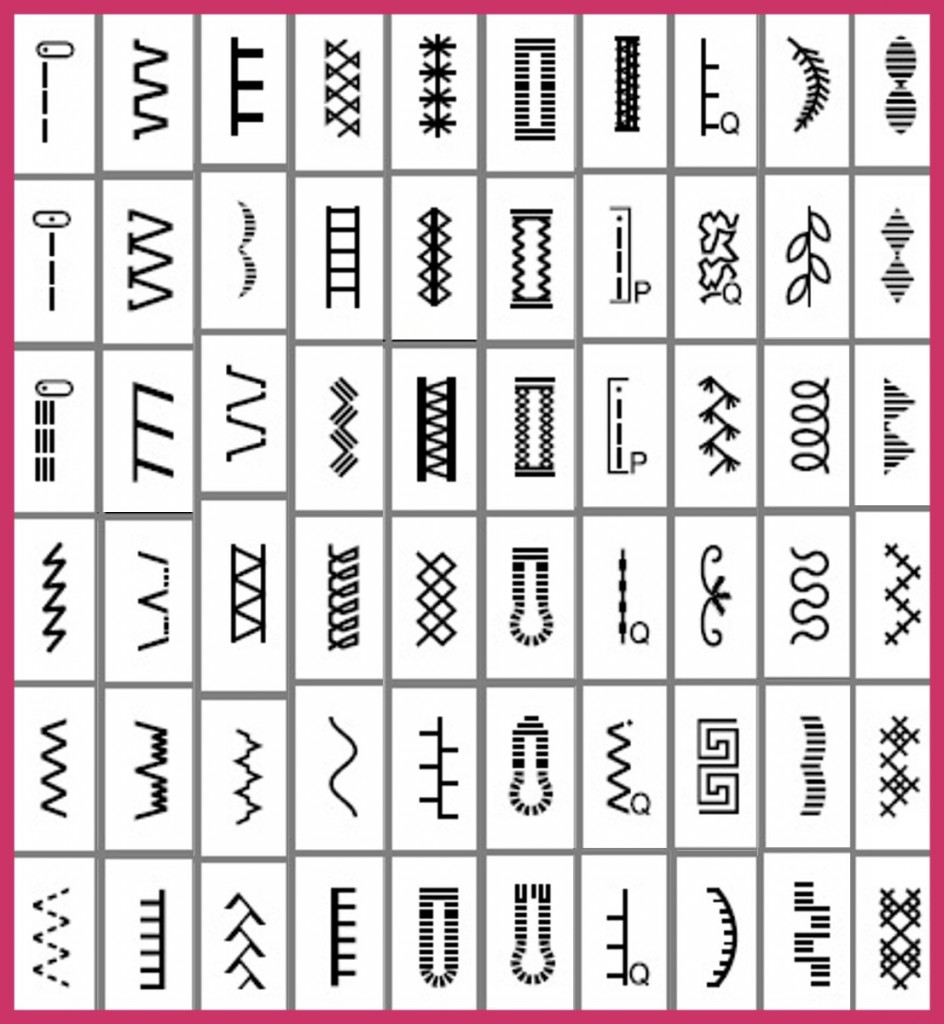 Sixty – count ‘em! – 60 stitches. In this price range, that’s outstanding! Stitches include utility stitches for straight stitching, alterations, and making clothes as well as a number of decorative stitches, applique, heirloom stitches and quilting stitches. The total count includes the 7 buttonhole styles.
Stitch width and length can be adjusted up to 7mm for certain stitches. You select the desired pattern by pressing the plus and minus buttons around the LCD panel until your desired stitch number appears in the screen.
The list of stitches and their respective stitch numbers are printed right on the machine front so you won’t have to look at your manual every time you want to switch from one design to another.
The stitches density is nice and tight. The stitch spacing is even and they look great. Checking a satin stitch is a good test for density and this one passes easily. The stitches have nice, close threads with no gaps between.
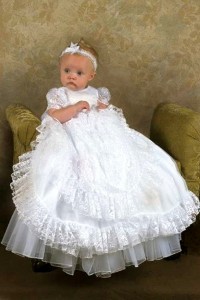
You’ll see the mention of heirloom sewing capabilities and heirloom stitches on a number of machines. This kind of sewing is based on the French hand sewing techniques used in the 19th century. Decorative and special stitches are required for attaching lace to lace or lace to fabric in order to prevent unsightly seems from showing through the delicate fabric. This machine has a number of pretty heirloom stitches.
This type of sewing is often used to make baby christening gowns, lace camisoles, and bridal gowns.
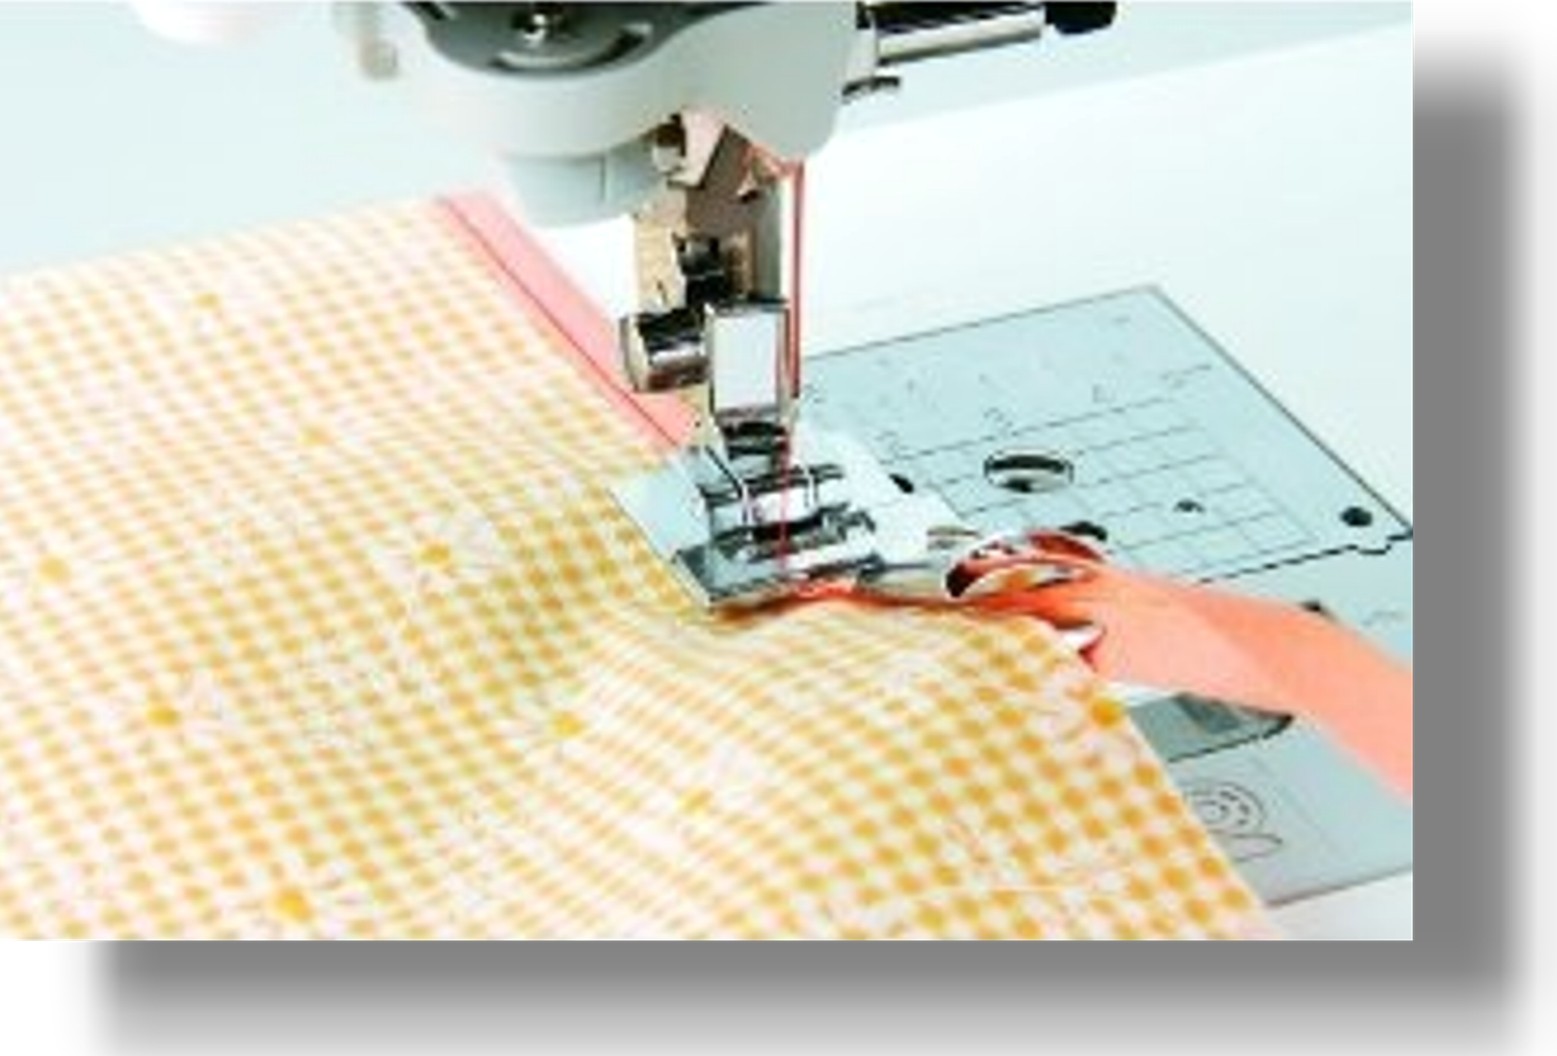
Included Presser Feet Even Covers Quilting
(Back to Top)
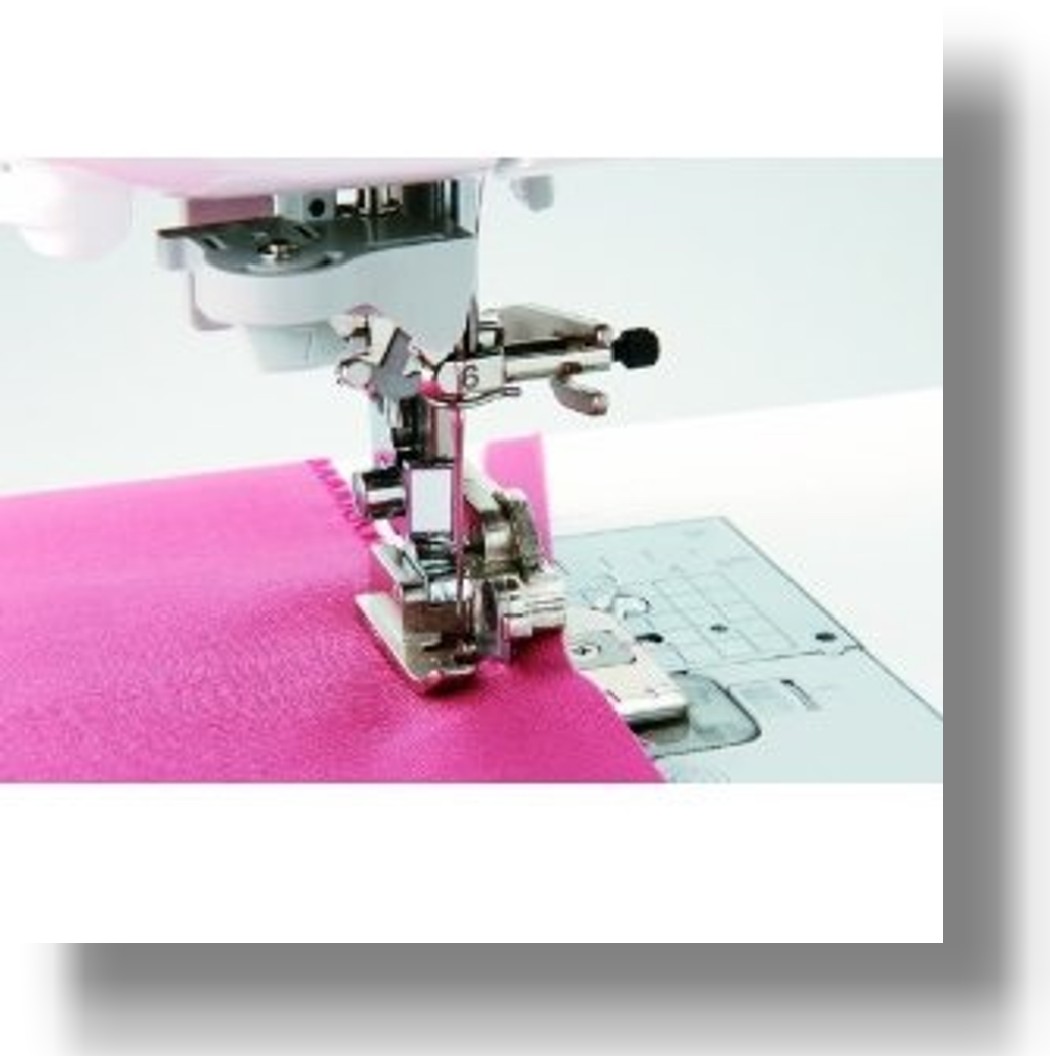
The presser feet snap into place on rather than being screwed in like on older machines. This is easier on your hands, ideal for kids, and makes for much easier foot replacement. The push of a button on the back of the presser foot holder causes the presser foot to fall off. Simply place a different presser foot under the holder, lower the presser foot lever and the new foot clicks into place.
 If you haven’t sewn in ages and only remember basics from a long ago home ec class forced upon you in junior high, you might not have worked with anything but a general presser foot. Today, presser feet play a major role in getting more out of your sewing machine. They automate tasks that used to be performed by hand or through sewing machine gymnastics that seemed impossible to accomplish without years of experience.
The presser foot sits on top of your fabric as you sew. Its purpose is to hold the fabric in place against the feed dogs on the bottom so the fabric moves forward as you sew. Other styles of presser feet have been designed which manipulate fabric to accomplish certain sewing techniques that used to be done manually. For example, there are presser feet that will make a buttonhole with almost no intervention from the sewer, presser feet that make it easier to insert a zipper, and presser feet that are used to perform certain decorative stitches.
Machines come with at least a general purpose presser foot, may come with others, and can often be enhanced with the separate purchase of even more presser feet. It uses low-shank presser feet so you can attach other, generic, low-shank presser feet and do all kinds of nifty sewing with your new machine.
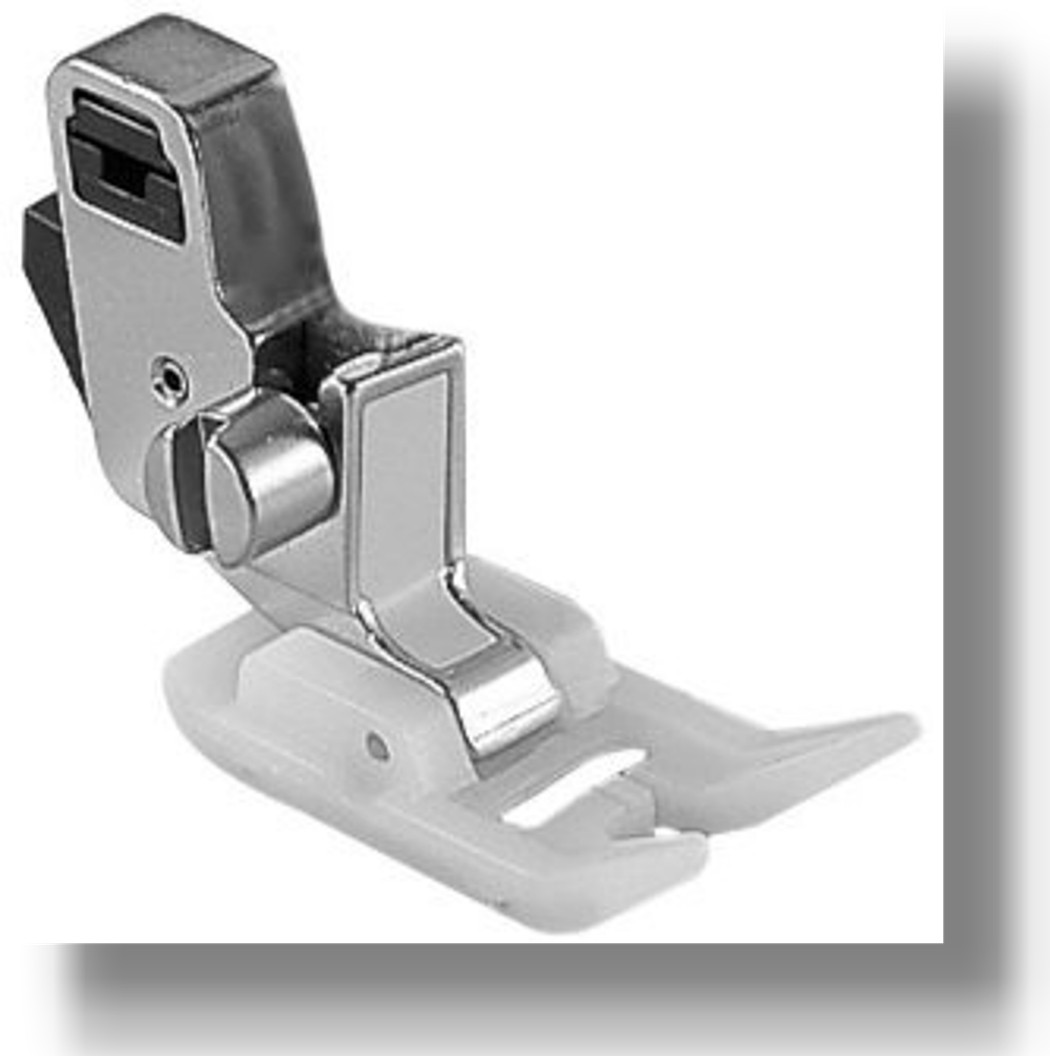
Included are an impressive 9 presser feet:
- Zigzag – also referred to as a General Purpose presser foot.
- Buttonhole – makes buttonholes automatically. Regular sized buttons fit right in the back of the buttonhole foot and the machine uses the button as a guide for making a perfectly sized buttonhole in one of 7 different styles.
- Overcasting – for more professional looking seams with some protection against fraying.
- Monogramming
- Zipper
- Blind Stitch
- Button Fitting Foot – Instead of hunting around for a spare needle and thread to replace buttons that have fallen off of shirts, jackets, and pants or to attach them manually to your garment projects, just use your sewing machine and the button fitting foot.
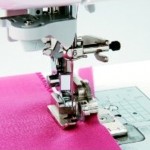
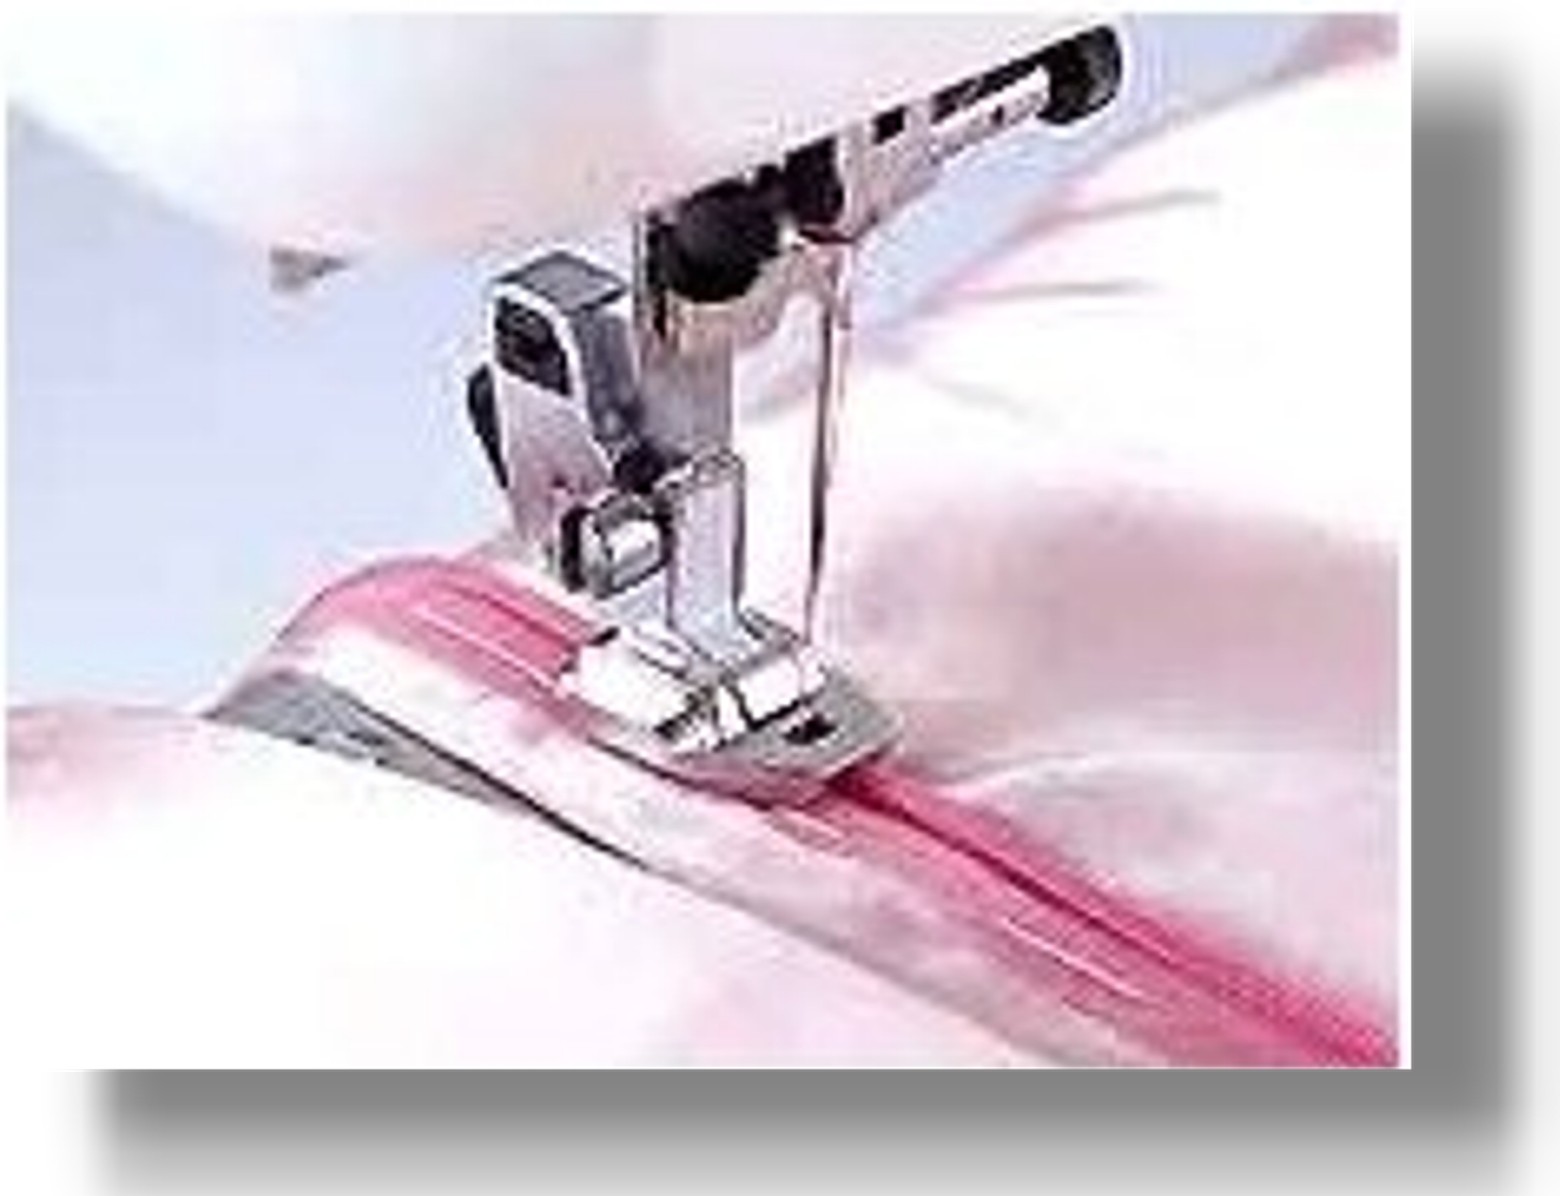
- Walking Foot – a presser foot with feed dogs for better fabric control when quilting or working with thick layers of material.
- Quilting Foot – Spring activated quilting foot can be used for free motion quilting, free motion embroidery, or for darning.
The general purpose (or Zigzag) presser foot has what’s called a “leveling” button on the back. It’s a little black button that helps the presser foot handle really thick seams – like the intersection of side and cross seams at the bottom of a jean pant leg. When you come to such a thick seam, just push the leveling button and the presser foot will have no problem climbing over the change in fabric thickness without dropping stitches.
What about the 1/4″ presser foot?
Sewing a 1/4″ seam is a critical step in some types of quilting so buyers are often surprised that there’s no 1/4″ presser foot included in the purchase of a machine that comes with so many other quilting related features. There are two easy solutions, though. There are two piecing stitches built into the machine that sew a true 1/4″ seam or, if you’d like, you can buy the Brother 1/4-Inch Quilting Foot separately when the time is right.
It’s important that you account for the value of additional presser feet that come with a machine when you consider your options. Extra presser feet can cost anywhere from $5-50 depending on the type of foot so if you’re getting a number of them included in the price, you’re really getting an even better deal than a comparable machine with fewer accessory feet. That there are so many included feet saves you from having to shop around for them later.
Probably the Most Features You Can Get in this Price Range
(Back to Top)
 For the money, this machine over-delivers on ease of use. It’s one of the few machines in this price range that includes a sliding button that controls the maximum speed of the sewing machine and a Start/Stop button so you don’t have to use the foot pedal, although the foot pedal is included for traditionalists.
Beginners like that this machine is easy to use but can also handle more complicated projects whenever they’re ready. It has a ton of features:
- LCD display with button control stitch selection
- Six point feed dogs
- 1-touch start/stop and reverse functions
- Easy automatic needle threading
- Quick-Set Bobbin (drop in – the easiest!)
- Free-arm sewing machine
- Electronic speed control
- Max sewing speed 850 stitches per minute (spm)
- Manual thread tension with adjusting dial for enhanced control
- Automatic thread cutter
- Variable needle position
- Vertical thread delivery
- Second spool pin for twin needle sewing
- Presser foot lever control with 3 height settings
- Built in manual thread cutter on the left side of the sewing machine
- Built in carrying handle
- See through bobbin cover
- Extra wide work table to assist with large projects
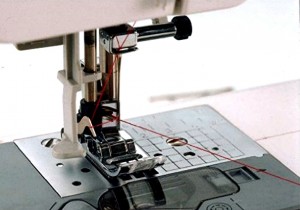
The drop-in bobbin is the easiest bobbin setup you can get. Even if you’ve never sewn before you’ll have no problem following the directions on loading the bobbin and inserting it into the case. There’s a printed guide right on the plate that reminds you exactly how the bobbin is to be inserted as well as a manual thread cutter right where the bobbin thread pulls to the side so you don’t have to use your scissors or the upper thread cutter to trim off the bobbin thread.
 There’s also no need to draw up the bobbin thread. If you’ve sewn on older machines, you know you have to use the hand wheel to guide the needle down slowly and then back up so that you can try to grab this tiny, little loop of bobbin thread and pull it up between the presser feet. Not with this machine! Just insert the bobbin, pull the thread to the side, and you’re ready to sew. It’s the elimination of these pesky sewing tasks that makes today’s machines so much easier to use.
It will take needles sized 9-16. Out of the box, it’s equipped with a size 11 needle which is fine for some thin and most medium weight fabrics. This is not a good needle for thicker materials like denim but there are 3 needles that are included in your little pack of accessories including an extra size 11 needle plus a size 14 and a size 16 needle. Those larger needle sizes are suited to thicker fabric types like denim so you’ll just have to swap out the needle based on the type of material being used. Read the guide in the manual and use the right combination of needle and thread and you’ll be able to plow through most materials. Changing the needle is easy, too, just use the supplied screwdriver to unscrew the clamp holding the needle in place, pull out the existing needle, insert the new needle and screw the clamp back in place.
 If you’re going to work on really large projects like a full-size quilt, you might find it moves a bit because of the drag of a large amount of fabric versus the light weight of this machine. Just put a rubberized mat or a OLFA cutting mat
 under the machine.
In between uses, it resets all stitch settings so if you are using a stitch you’ve customized for length or width you’ll want to make note of those settings for the next time you start working on your project. This is not uncommon for machines under $200. Some of the more expensive ones will let you save stitch settings into memory but this model does not have such memory storage.
The extension table has a ruler guide printed on it which is useful for measuring seams or fabric length.
This is a self-maintaining machine which means you do not ever need to oil it. Today’s machines are often made with materials that naturally reduce friction or are self-lubricating rather than requiring oil like older machines.
Operating Buttons and Controls
(Back to Top)
Computerized sewing machines have been around for awhile but they might still seem intimidating. I’m a gadget geek so I say the more buttons the better but not everyone feels that way. This model uses just a few, well-organized buttons to do a lot of the grunt work. In fact, it has all my FAVORITE buttons on a sewing machine: Start/Stop button, the Reverse/Reinforce Stitch button, and the Needle Up/Down button. These three buttons sit just above and to the right of the needle arm so they’re right above your hand as you work. (It also beeps at you if it’s set up incorrectly so you can’t really mess it up!)
Start/Stop Button
Traditionally, to get a machine to actually start sewing, you’d press down on the foot pedal with your foot. You can still do that with this machine OR you can just push the Start/Stop button to…well…start and stop sewing. I have this on my sewing machine and as a result I’ve never attached the foot pedal. I just don’t need it.
Reverse/Reinforce Button
When you hold the Reverse button down while sewing the straight or zigzag stitches, the machine moves your fabric backwards. You do this when you are first starting or stopping a line of stitches to lock them in place.
Reinforce is much the same thing except it does something cool for the other stitches. If you’re sewing a decorative stitch, locking the ends of the seam with a straight stitch is kind of sloppy, right? You either have to hide that part because the stitch patterns overlap each other or you hope no one notices. With this machine, if you select a decorative stitch, start to sew and then you push the Reverse/Reinforce button to lock the end of your stitch in place, it sews backwards in the same pattern as your selected decorative stitch so there’s no sloppy mismatch at the end of your stitch lines. This means you won’t have a line of straight stitches running over the end of a line of asterisk stitches. You might not think you’ll need this but just wait until you tackle the more decorative projects where your stitches are going to show like the pockets on the front of a toddler’s dress or the center of a baby quilt. Nice and tidy and very professional!
Needle Up/Down Button
The Needle Up/Down button is also pretty self-descriptive. Push it to move the needle up or down. It’s an automation of the hand wheel on the side of the sewing machine. You can also program your machine to always stop with the needle in the down position or program it to always stop in the up position – the choice is yours and you can change this as needed based on the type of project you’re working on.
 An LCD panel surrounded by four +/- buttons (two below and two to the right) is used for stitch selection and stitch settings. The screen displays your stitch information and provides the letter code of the presser foot to use with that stitch. It’s easy to read with sufficiently large print. This screen also relays error codes to you if the machine encounters any problems.
There’s one remaining control button to talk about and that is the speed control slider in the middle-top of the machine. This is another convenient button found often on more expensive sewing machines. This button moves to the left and to the right and controls the maximum speed at which the machine will sew whether you use the Start/Stop button or the foot pedal.
Having a speed slider with different speed options from slow to maximum sewing speed provides the optimum amount of control over any sewing situation. If you need to go slow because you are just learning, working on a delicate piece of work or teaching a child, you can do so. If you need to fly through lots of straight lines, set the machine on max speed and just push the start button.
Sew without the foot pedal!
I didn’t realize just how convenient a feature like that could be until I was talking to my dad awhile ago. My dad is on the board of directors for a charitable organization that provides support and services for those with a particular disability. This disability can cause partial paralysis and he mentioned that one of their clients had noticed how sewing was becoming more difficult for her because she couldn’t work the foot pedal anymore. She had tried using her arm to work the pedal but considering that she also had to use her hand to guide the fabric, this wasn’t the ideal solution. When I mentioned that there are sewing machines now that don’t require the use of a foot pedal, he made a note to share with their staff. If they add a sewing machine to the new dorm facility they’re putting up, it will be something like this one.
The other benefit of a machine that doesn’t require you use the foot pedal is space. I’ve got a fair amount of square footage in my house but I also have a slew of big, growing BOYS and darn if they don’t eat up a lot of room! Ideally, I should be able to fit a small sewing table in my office for the sewing machine if it wasn’t already doing double duty as a home gym so all I’ve been able to scrounge up is the top of a spare dresser. This means I either sew standing up at the dresser (which I’ve done) or move the sewing machine out to the kitchen table as needed (which I’ve also done). Both are far easier to accomplish without having to worry about the foot pedal. It’s simply not easy to control the pedal if you sew while standing and having to make sure I gather it up while moving rooms is just a bother.
Video Demonstartion
(Back to Top)
If you can’t test a machine in person, the next best thing is a video demonstration. The following video shows you how it works. (One look at the embellished clothing in the beginning of the video and it’s obvious that it acts like a more expensive machine.)
Dimensions: L 16” x H 11.05” x D 6.7”
Weight: 13 pounds
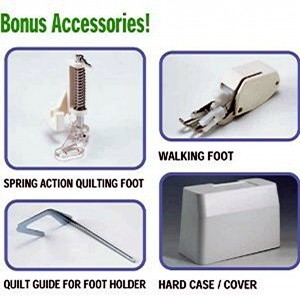
Accessories
(Back to Top)
These sewing notions are included
- Accessory storage within the machine
- Hard cover case
- Seam ripper
- Bobbins
- Needle set
- Twin needle
- Cleaning brush
- Screwdriver
- Extra spool pin
- Foot controller
- Built in LED work light
- 3 needles
- 3 bobbins
- Quilting guide
Great Optional Presser Feet You Can Add On Later
(Back to Top)
You can usually add more accessories after your purchase and there are a couple of presser feet that don’t come with this one but could really be useful for certain types of projects.
Turn it into a mini serger!
Brother SA177 Side Cutter Presser Foot
The other presser foot accessory that looks like it could cause me to suddenly forget I have other household responsibilities like, oh, laundry and cooking, is the Brother SA150 Pearls and Sequins Foot. All I had to do was see the “pearls and sequins” and I was enchanted. I could picture myself staying up all night attaching a little bling to my pillow covers, and then my tablecloth, and then the collars of a few blouses…and then I’d run out of things and my three sons would be forced to hide their clothes! 😉
SA109 Quarter Inch Binding Foot

Getting the Best Price
(Back to Top)
After reading hundreds of comments, comparing features, and studying all the printed material, there’s no doubt in my mind that under $200 is an incredible bargain.
Where to get the best deal!
It’s so popular, in fact, that you get the benefit of a constant, on-going price war between Amazon and Walmart. Most days they are the EXACT same price but every now and then you’ll find one is a few dollars lower than the other so it’s worth it to check them both when you go to buy. Plus – while Amazon offers free shipping, Walmart offers free shipping to your local store for pick-up. For some people, that’s simply more convenient.
This machine is so popular and easy to use that many sewing shows, expos and workshops use them in their classrooms because they know even beginners can get comfortable with the operating instructions in a very short amount of time. It’s lightweight but not so much so that it can’t hold up to large projects. The only thing to do before you buy is to compare it to the newer Brother CP7500 sewing machine here: side by side chart.
What Kind of Bobbins Does it Use?
(Back to Top)
It uses plastic Style SA156 Sewing Machine Bobbins.
These are not generic bobbins. If you look closely, they are just a tad taller than the interchangeable bobbins used with some other machines but you can find them very reasonably priced so it’s easy to by more or stock up at a later date.
Included Hard Case Wards Off Dust
(Back to Top)
The hard cover case that’s included is a great dust cover but it’s not a carrying case. There is no carry handle and no bottom. It’s still a value add, though. If you let dust build up inside your machine because it sits uncovered in between projects, you’re asking for problems. At the very least, you should plan on providing dust protection for your sewing machine when not in use and the best type of coverage is dense material like the included plastic case or an vinyl cover.
The cover doesn’t have a cut out or a hole on the side to accommodate the power cord so you’ll need to remove that when you use the cover. Might seem annoying but it’s good for the machine. Electric appliances draw some minimal amount of electricity when they’re plugged in and off so unplugging will be saving you and the planet in some small, but positive, way. As with computers, power surges can have an impact on your sewing machine so leaving it unplugged when it’s not in use.
If you need a carrying case, though, with a handle than consider getting the Brother 5300 Universal Sewing Machine Carrying Case for about $25.
Here’s Why I Like it for Beginners
(Back to Top)
One of the biggest fears with buying a first sewing machine is that you’ll have spent too much for one of those fancy machines that have lots of features you won’t ever use or that your desire to save money will mean you end up settling for a really basic machine that does nothing more than handle alterations. If there’s any chance that you’re going to want to do more than the basics, it’s hard to ignore those cool machines with pretty stitches and button controls and lots of accessories.
That’s what makes the this model such a great deal. It’s not expensive but it sure acts like it. This is a machine that will grow with you as you learn more and more sewing techniques and includes the accessories you’ll need in order to try those techniques.
In fact, it has so much to offer, that it is often bought by more experienced sewers who want a sturdy backup or traveling machine.
Beginners of all ages consider the CS600i to be one of the best machines they could have chosen. Those who were older had concerns that it might be difficult to learn because of the computerized functionality but found it was surprisingly easy to learn. There’s a Quick Start guide that can help you get up and sewing in a matter of minutes even if you’ve never sewn before.
Those buying for children or young teens were concerned that the machine might have too many features but found kids adapted easily to using different stitches and could switch out the presser feet without a hitch. There are a couple of sewing machine features that I find are most helpful to those who are just starting to sew and speed control is one of them. This makes it super simple to slow the machine down so kids as young as 8 years old can get a feel for how to work a sewing machine.
Highly Popular with Consumers
When I first wrote this post in April 2010, the machine had 310 ratings on Amazon. Today, (May 27, 2012), there are over 970!
The more ratings, the better and richer the feedback. Breaking down this total count gives us really detailed information about longevity and performance.
Of those 900+ reviews, 631 people gave it the highest rating of 5 stars. The remaining marks include 159 four star ratings, 32 three star ratings, 32 two star ratings, and 66 1 star ratings. If you consider 4 and 5 stars to be above average, then 86% of Amazon consumers who commented rated this sewing machine above average. Pretty strong recommendation!
On top of that, these comments go back as far as January of 2007. That’s over five years of positive feedback for this model. You know what really sticks out for me? If this machine lasted ONLY four years, the total cost spread across those 48 months would be just $3.50 a month. That is amazingly cheap!
It’s always helpful to hear about some of the projects completed with a certain machine. It helps one understand the capabilities and how they relate to projects that might be in mind. Some of the projects people finished include full-size quilts, sofa cushions, drapes, fabric panels for closets, pillows, clothing, doll dresses, outdoor furniture, hemming jeans, and kites. These demonstrate the versatility of this machine.
Walmart shows even better ratings. In April, there were 491 and now, the end of March 2012, there are 833 with an average rating of 4.6 on a scale of 5. 93% of the reviews have given this machine a rating of 4 or 5 stars and many noted how nice this machine was for beginners.
Average Rating: 4.5
Pros, Cons & Manual
(Back to Top)
![]() Pros: The undeniable, #1 pro for this machine is the unbelievably low price. There are really good sewing machines that cost almost the same, are appropriately priced for the market but have maybe 10-20 stitches and one quarter of the features of this machine. If you stack all Brother and Singer sewing machines that cost under $200 side by side there isn’t a better deal for your money. That is HUGE!
Pros: The undeniable, #1 pro for this machine is the unbelievably low price. There are really good sewing machines that cost almost the same, are appropriately priced for the market but have maybe 10-20 stitches and one quarter of the features of this machine. If you stack all Brother and Singer sewing machines that cost under $200 side by side there isn’t a better deal for your money. That is HUGE!
Some of the built in features can only be found with machines that cost twice as much as this one – the Start/Stop button, speed control slider, and needle up/down buttons are my absolute favorites.
On top of that, Brother throws in all of these extras like the additional presser feet, the extra wide work table, and the hard dust cover. These are all tangible goods that you’d have to buy separately for most other sewing machines and are worth an easy $75 alone.
The machine operates quietly and the stitches are nice and even. It’s very easy to use and sews easily through a variety of fabrics.
Threading is easy and the drop-in bobbin is a noticeably less finicky to use than front-loading bobbin systems.
![]() Cons: Because of the huge number of online feedback and experience, it made sense to break the cons down into a couple of types. First, there are some things that are missing from this machine that more experienced sewers might consider important for really advanced sewing. I called those OBJECTIVE cons. They’re indisputable and are helpful to potential buyers in evaluating the machine.
Cons: Because of the huge number of online feedback and experience, it made sense to break the cons down into a couple of types. First, there are some things that are missing from this machine that more experienced sewers might consider important for really advanced sewing. I called those OBJECTIVE cons. They’re indisputable and are helpful to potential buyers in evaluating the machine.
Objective Cons
The presser foot pressure is not adjustable. This is common in most entry level sewing machines but really advanced sewers like to have that level of control.
The extension table doesn’t snap perfectly into place but it’s still extremely functional. Some of the accessories and internal parts are made of plastic. That’s what helps keep the machine lightweight and inexpensive but some people are turned off by plastic parts.
Storage for the accessories is just a small opening inside the flatbed attachment. Nothing fancy and you might find it easier to store the accessories in a stand-alone storage box.
If you turn off the machine, it returns to stitch default settings and does not remember any changes you made. Again, not uncommon for machines in this price range but can be annoying if you are used to a machine that saves your settings.
Subjective Cons
Then there are the cons that are more SUBJECTIVE. Some people mentioned these were actually pros and some people said they were problems. These kinds of complaints could just as easily be driven by user error or user preference rather than through any fault of the sewing machine but it’s important to understand any trends in these types of comments.
For example, several people noted that the work light is not sufficiently bright. Others, however, mention that it’s really bright and ideal for sewing. Reminds me of when my husband and I are looking at a new sofa and I think it’s beautiful and he says it couldn’t be any gaudier. All I can say is eyes are funny things and we don’t all have perfect vision. The good news is that if you find the light isn’t bright enough you can put a nice work lamp near your sewing machine and the problem is fixed.
Others say the LCD screen isn’t backlit well enough, while others haven’t had any problems. Having a work lamp or small flashlight you can point at the LCD screen can help IF this becomes an issue for you.
Thread jamming, bobbin issues come up in a portion of the comments. This can happen with even the most expensive sewing machines.
It’s easy to forget that a sewing machine is really quite an amazing and complex piece of equipment. The machine application of thread to fabric requires precision operation using very small items – the fine point of a needle following a programmed pattern working with filaments of top and bottom threads inserted and looped with just the right amount of tension. The right thread type and weight must be used with the right needle for each type of fabric.
If you use the wrong thread, neglect to replace the needle periodically, use the wrong needle for the fabric or the machine, or don’t follow the instructions for top and bottom threading, you can run into problems. If you run into a problem with jamming, the first things you should look at are the needle, the thread, the bobbin, and the bobbin case. The odds are good that replacing or cleaning one of those things will fix most issues. Only use accessories and notions that are compatible with your sewing machine and your fabric. If you can’t fix the issue by following these steps, do not continue to use the machine. Instead, take it in to be serviced by a qualified professional.
While most people said it had no problem going through denim or multiple layers of heavy fabrics, some said it just couldn’t cut through much more than medium weight fabrics. I know it seems like the sewing machine should punch through anything without having to make any adjustments but that’s just not true. The manual provides a chart that specifies the type of thread and the needle that is required for different types of fabrics. Adhering to the manufacturer’s recommendations based on the fabric you are using is a must for preventing any issues with heavier fabrics.
Manual available online here: Brother CS6000i Manual
Manufacturer’s Warranty: As of this date, Brother offers a 1 year warranty on parts and labor, a two year warranty on electronic pattern control and selection components (parts only), and a 25 year warranty on shafts and rods on the machine head.
These two retailers often have very competitive prices for the CS6000i:
COMPARE PRICES
Amazon
Features Summary:

Wow! I need to check out this machine – I hope it is available in Canada…. sigh!
Oh, I’m sure it is! This is one of the most popular sewing machines you can buy online. I hope you find one!
I don’t know how to leave a comment or question so post it here. I am looking at this CS6000i and here is what I need: I need an easy to use maching, I am an infrequent sewer, would like a machine that can also sew leather (walking foot enough?). From what I’m reading, an height adjustable presser foot would be the ticket but I can’t find that in the less expensive Brother machines. I would welcome any advice or suggestions! Thank you, Mimi
Mimi – The CS6000i will handle leather. A walking foot can help move the leather more fluidly under the presser foot.
However, a lot depends on how often you’re going to be sewing with leather. I’d suggest three options for you:
If you’re going to sew nothing but leather and you’re going to do an extensive amount of sewing, then you might need what’s called a walking foot sewing machine.
If you’re going to be doing a medium amount of sewing with leather but might work with some other materials, the SINGER 4411 Heavy Duty Model Sewing Machine might be a great choice. It’s a heavy duty machine that sews faster and more powerfully than most entry-level home sewing machines and has adjustable presser foot pressure.
Finally, if you’re going to be doing equal amounts of sewing leather and other types of fabrics, the Janome Sewist 500 (which I’ve described here) is a solid, mechanical sewing machine with a great reputation, a nice selection of stitches, and adjustable presser foot pressure.
The last two options are very reasonably priced.
Hope that helps!
Sincerely,
Erin
Hello,
I love the information on this website. I am a novice sewer (very novice) and am looking at purchasing a brother sewing machine. I thought I had settled on the cs6000i but I just saw that costco has the Brother XR7700 for about $175. Which machine is better? I can’t find a side-by-side comparison. Thanks!
JS – Glad you like the site. 😉
These two machines – the Brother CS6000i and the Brother XR7700 are identical. They have the same features, same layout, same size, same buttons, same set of built in stitches, same accessories and the same presser feet. You find this a lot in the Brother sewing machine line. Sometimes they’ve made a licensing agreement with a particular store or brand. Sometimes the change in model numbers has to do with the source and materials of the internal components. Comparing the manuals and images side by side can sometimes be the only way to tell that two machines are really the same, at least in regards to their features and options.
Good catch. I hadn’t seen the XR7700 before!
Erin
After a careful reading of the description of both machines, I believe the only difference is that the XR7700 includes one additional item, a narrow hemmer foot. Otherwise, I agree, they are identical.
I’m sure both machines are fantastic, but I’ve read descriptions of the two machines and they are not identical. Just for one example, xr 7700 lists 70 stitches, vs. 60 in the cs6000i. I’m researching for a gift purchase, so I don’t know if this is an issue or not, and I’d venture a guess that ease of use and reliability go a lot further than 10 additional stitches. ALSO… just because ANY machine offers similar features, it does NOT mean they are identical in materials or construction. Just my opinion for what it’s worth.
Hi! dose somne know’s if the Brother CS-6000i comes for 220V power?
Arvils – I don’t know. I read through the manual for reference and while there’s a section for instructions for users in the UK and other countries, it does not necessarily mention the voltage type. You might want to read the first few pages of the manual online and see if there’s a section that answers your question or contact a dealer. Are you outside the US looking to order from the US?
Sincerely,
Erin
hello~dear~
happy new year~
i have some qs ~woulf u help me, pls^^?
i want to buy 5500rw cs6000i or sq9000~ but i dont know which one is better/.\~can u help me?~
i want to do heavy quilting, like denim, tweed and canvas~ can sq9000 do that well?~
because i like sq9000 has letter font~but i worry about it cant do heavy quilting~any many people said~5500rw and cs6000i is better than9000~~~
thanks for reading
looking forward ur reply~
manman – Happy New Year to you, too!
I think I’d take the CE5500PRW off your list and just look at the CS6000i as compared to the SQ9000 because the 5500 doesn’t have the stippling stitch nor does it come with the walking foot and the extension table.
Between the CS6000i and the SQ9000 the main difference is the letter font on the SQ9000, the additional stitches built into the SQ9000, and the fact that the CS6000i weighs a couple more pounds.
Both can handle heavy quilting and fabrics as long as you use the right thread/needle combination but the additional weight of the CS6000i might hold up better to bulky fabrics. You might be able to make the SQ9000 more stable with a mat or a sewing cabinet.
The other challenge might be finding the SQ9000 for sale. Walmart had it but it’s out of stock at the moment and not even the Brother website will give you an alternative buying option. There might be some refurbished listings online or the machine might be in stock at Walmart’s physical stores.
I do think the CS6000i is probably a bit sturdier and a better deal for your money than the SQ9000 but that both could hold up to the kind of quilting you want to do, if that helps. 😉
Sincerely,
Erin
I thought the brother SQ9050 AND SQ9000 had more feet?
Kelly – Yes, the Brother SQ9000 does have one more presser foot than the CS6000. It comes with the 1/4″ foot while the CS6000i does not, although it can be purchased separately for use with the CS6000i.
Thanks!
Erin
I am new to quilting and have decided to go with the Brother 6000i. However, I have two questions about this machine:
1) I read a review that said that the quilting foot that this machine comes with is not the 1/4 inch quilting foot but rather the free motion quilting foot. I would like to know what that means, and more importanly, what kind of quilting foot I actually need to complete the quilting project (a table runner with placemats) that I have begun. Just so you know, Brother describes the quilting foot that this machine comes from as a “spring action quilting foot”. I simply do know know enough about quilting jargon.
2) What other accessories (other than thread, fabric, and a design book) is needed beyond what this machine includes with to quilt? I would like to buy everything that I need at once.
Thanks!
Sandy – You’re correct. The quilting foot that comes with the Brother CS6000i is not the 1/4 inch quilting foot. Instead, it is what is often referred to as a darning foot. It’s tall and has a spring around it and it moves up and down in time with the needle so that the sewer can move the fabric around themselves for free motion work. The 1/4 foot looks more like a standard presser foot but has a 1/4 seam marker so that you can make nice, even seams when piecing together quilt blocks or sections. You can see the quilting foot that comes with the Brother CS6000i here: Brother SA129 Quilting Foot.
You can sew 1/4 inch seam without the 1/4 inch foot using the seam guide on the needle plate or a piece of tape on the needle plate as your marker. You should be able to complete your table runner and placemats without having to buy any additional presser feet.
Other accessories you may need for quilting include extra needles. If you’re going to do a lot of quilting you might want to invest in a pair of Machingers Quilting Gloves. These textured gloves provide better control as you move the fabric during machine quilting but you wouldn’t need these for your table runner and placemat project.
I can’t think of anything else you’ll need to get started. Between the items you already mentioned and the quilting accessories included with the CS6000i you’ll be in good shape!
Sincerely,
Erin
Hi,
I am looking at the Brother cs6000i or Brother Project Runway innovis 40 for my 8 year old daughter and I to share. We are new to sewing so I am not sure if it is worth investing $500 in a machine when there are some less expensive ones out there that will probably be sufficient for our use (pillows, tote bags, baby blankets, etc). My questions are 1) is it worth it to make the investment in a more expensive machine? and 2)does the cs6000i have the function of moving the needle over for a 1/4 seam?
thanks,
Amy
Amy – It’s hard to tell whether spending the additional money would be worth it. The core differences between the two machines are the materials inside the machine, the walking foot and quilting foot are not included in the price of the Innov-is, and the Innov-is 40 has a superior, 7 point feed dog system for the ultimate fabric control.
If you’re going to do a lot of sewing then the additional expense might be worth it. The other thing to consider is that the CS6000i is mostly available online whereas the Innov-is machines are available only through retail locations. The benefit of buying through a retail store is that you may get free lessons or a discount on fabric and notions so it’s worth taking that into account. Find out what your local Brother dealer offers with your purchase, see if they have an upcoming sale (sometimes they’ll give you the price early!) and then compare your two options. Both are great machines with a reputation for performance and should serve you well – just a matter of whether you’ll need the extra power in the Innov-is and can get it along with some lessons and savings on future goods.
My thoughts anyway. 😉
Sincerely,
Erin
Thank you so much for quick response!
Do you happen to know if you can move the needle over on the cs6000i for making 1/4 inch seams? I saw the sewing teacher push a button on the innovis 40 to move the needle over. It really is incredible what sewing machines can do these days.
LOL! I knew I forgot something – sorry! I had double checked but forgot to include it in the response. Yes, you can move the needle to either side and use the edge of the presser foot for 1/2 seam. On the CS6000i it’s the selection of the straight stitch with the needle to the left or the needle to the right that will do this. It’s funny, my mom and I were comparing her 1973 Viking to my 2010 Janome and there’s just no comparison! I almost have her convinced that it’s time to go computerized. 😉
Thanks!
Erin
I have been looking to buy my 1st sewing machine for a while, and I will be the 1st to admit the idea is a little daunting. I’ve narrowed my searches down to the Brother cs6000i or the Singer 7256. Price wise they are similar but even thought the Singer has 10 more stitches than the Brother you don’t get all the accessories. I have read that the Singer 7256 was rated the Consumer’s Digest “Best Buy” though. Functionally, are they about equivalent? Is the ease of use about equivalent? I know these brands are competitors and for the price I can’t decide which would be better for my needs (alterations, pillows, baby blankets, embroidery, ect). There is just so much information to sift through, and honestly I’m about to pull my hair out trying to come to a conclusion. PLEASE HELP!
Kat – You poor thing! Let’s see if we can save your hair. 😉
Both of these machines would be capable of handling the kinds of projects you have on your list. I do want to clarify, though, that neither of these sewing machines do embroidery on their own – they only do “free hand” or “free motion” embroidery where you are in control of the fabric and the stitching. Just wanted to make that distinction because there are combination sewing and embroidery machines that do embroidery in a sort of automated way vs “free motion”.
Both have good ratings although, the Singer 7256 has earned the Consumer Digest Best Buy seal. Online reviews of both are positive but I’d go so far as to say that the most recent online reviews of the Singer 7256 are absolutely glowing! People who have used it say it’s quiet, reliable, produces beautiful, even stitches and is easy to use.
There are some differences between the two, though. On the Brother CS6000i, there’s a drop feed dog lever which causes the feed dogs to drop below the needle plate so that control of the fabric is in the hands of the sewer. On the Singer 7256, there is instead a cover which goes over the feed dogs to keep them from controlling the fabric. I do not have an opinion on which one is better to use but considering that someone tonight recently commented on a problem in getting their Singer machine feed dogs to come back up after they lowered them, using a cover instead certainly reduces the chance of any problems re-raising the feed dogs (although I haven’t come across that being an issue with Brother machines).
There are a few control buttons on the CS6000i that you don’t get on the Singer 7256. There’s no Start/Stop button, no Needle Up/Down button, and no speed control function. I find these really useful buttons. With them, you can sew without the foot pedal, slow the machine down, and stop the needle in a down position so you don’t lose your spot or so that you can turn a tight corner.
I’d say there are more comments online expressing issues with Brother customer service than there are for Singer. I find their website more complicated to navigate, as well. More importantly than whether or not their Customer Service line may be an issue is the proximity of any Brother or Singer service center to your home. You might feel more comfortable buying a Brother, for example, if a Brother center is closer to you than a Singer center. It’s important to check how close your nearest Brother repair center is to you, too, just in case. Compare the same for Singer so you can put that information in the mix. You can check Brother here http://www.brother-usa.com/service/default.aspx?PGID=3 and Singer here http://www.singerco.com/support/us_warranty.html
So, after tossing you back and forth more than you’d probably hoped for, I’d say it comes down to this: Both are great machines and can do what you want. The Brother CS6000i has some buttons that can make things easier on you but won’t make the machine sew better or differently than the Singer 7256. The Brother comes with extra accessories that help with quilting and those accessories do not come with the Singer 7256 but can be purchased separately. Both have a good mix of decorative stitches but the Singer 7256 has more satin stitches than the CS6000i and the CS6000i has a few more cross stitches. Find which brand has the closest service center, weigh the total price of each (accounting for any additional accessories you’d have to buy for the Singer), and decide how much (if anything) those additional controls like the Start/Stop button are worth it to you. Those considerations will hopefully help you zero in on the machine you really want.
I hope I didn’t muddy the waters. If so, please feel free to ask for more information. I’ll help in any way I can! 😉
Sincerely,
Erin
Oh, also I want a sewing machine that can grow with my skill level. Another thing I have heard is that the Brother technical support is lacking badly.
Erin,
Thank you! Your professional opinion means a lot to me (whether you do this as a hobby to help people out or otherwise). I appreciate all the information you have given me. And pretty much based my opinion on service centers (just in case). I decided to go with the Brother bc the extra functions (instead of the foot pedal). I think this will be a great addition to my crafting skills and I have you to thank for that 🙂
Kat – So glad I could help!! This site was an idea from my mother who, after using the same sewing machine for over 35 years decided to buy one for her granddaughters and just about went mad trying to figure out which one she should get. It’s been our mission for the past year to try to make it easier for anyone else trying to decide between all the sewing machine options on the market. We have a long way to go but we’re having so much fun!
Enjoy your new sewing machine!!
Erin
Hi again, Erin! LOL
I know I’m a pest and I apologize, but I was looking into some greater detail into this machine, including the manual, and I have a question about the adjustable pressure foot thing.
There was a section in the Sewing Basics about sewing thick seams and how to accomplish it. It said to raise the feed dog and hold in the black button to the left of the foot while lowering the foot onto the thick seam, and that doing this will lock the foot in place level with the seam. I realize that doesn’t do anything for thin fabrics, which I understand the adjustable foot pressure is handy for too, but is that effect similar to what you’d achieve with an adjustable foot for heavier fabrics? (Again, I had never even heard of an adjustable foot pressure until finding your site, so I’m clueless. :))
Please no hurry on this, just curious, now trying to decide how important this adjustable foot thing is to me. 😉
Thanks again!
P.S. That was supposed to be raise the presser foot, not the feed dog. :/
You’re NOT a pest! 😉 Adjustable foot pressure and the leveling button are not quite the same thing. Machines with adjustable foot pressure have a lever or a dial where you can tweak how much or how little the presser feet push down on the fabric. It’s for really fine-tuning the machine with different fabrics. Walking feet and automatic pressure in machines does the job for most sewing, these days.
The leveling button on the presser foot holds the presser foot in a position where it can apply the most effective pressure to the fabric when encountering a sudden height increase. Think of the side of a pair of jeans at the cuff – several layers of fabric overlap at that section and if you’re hemming the pants you have to cross over that “hill” at some point. Rather than lose some of the effectiveness of the presser foot angling up to get over the hump, it can be held even to push the fabric through more evenly.
Dashing to son’s baseball practice!
Erin
I am in need of a sewing machine with a high shank. I am looking at a Brothers CS6000il;however, have been unable to find out if it has a high shank or a low shank. I need the clearance between the pressure foot and the plate in order to sew heavy or layered materials. I have a low shank and it will not do this. Would appreciate an answer. Thanks.
Hi,
Just an update to my Jan 19th post – I ended up purchasing the cs6000i from Amazon and couldn’t be happier. Amazon had the best price and they fedexed it to me in 2 days (even with free shipping). It has been super easy to use – I love the speed control, needle up button, etc for beginners it is perfect. Also, if you move the stitch selector button (I believe it is the bottom button) over to 5.5 it moves the needle over so that you can get a 1/4 inch seam. I am sure I would have loved the Innovis 40, but it really wasn’t it our budge at this time.
Amy
Amy – I’m so glad you like it! Isn’t that needle up/down button addicting? I have never used my foot pedal because that button is just so handy. Thanks for the tip on the 1/4 seam. I know a couple of people have been concerned about not having the 1/4 foot but I’d just read there were several ways to accomplish this without the foot and you’ve outlined a perfect method many will find helpful. Thanks!
Hi. I just found your review and was about to order the CS6000i until I noticed the size. Is it really under 10″ wide? My sewing machine is about 14″ wide and it seems like one any smaller would be difficult to use. Is this a small machine, like the ones crafters use, or is it a full size machine? Thanks, Debbie
Debbie – Good catch. I don’t think those dimensions noted above are accurate. Two similar machines that share everything but a model # are both L 16” x H 11.05” x D 6.7” and I believe the CS6000i has those dimensions as well. It is a full size machine, I assure you, not a 3/4 or mini.
Thanks!
Erin
Thank you so much! I watched the video and it didn’t look like it could be that small. I think I will go ahead and order it. My sewing machine has seen better days. 🙂 Thanks again! Debbie
Hi, I was comparing the Costco XR7700 with the CS6000i. It seems like they are no longer the same machine. The Costco XR7700 has 70 built in stitches and comes with ten presser feet as compared to 60/7 for the CS6000i. Is it possible that Brother swapped out machines on the XR7700?
The Costco machine costs a little bit more but it also comes with the 1/4 quilt foot – which just about makes up the difference in price but you have two additional feet and 10 extra stitches.
Can you shed a little light how the machine changed?
Thanks!
Vicki – It didn’t really change, at least in terms of operation and performance. Brother seems to design machines like cars. They start with a standard platform and design layout and then they build it in a series of models, each one with slightly more than the model before it. It’s why the CS6000i shares the same manual with the ES2000. The different model numbers seem to mean not as much a replacement of a machine but more with why and where that machine was built. This is just a guess on my part but you’ll often see the exact same machine with two or more different model numbers and then those different models are often sold through different retailers. Maybe it lets them do branding deals or agreements with the big box sellers.
The XR7700 has all of the same stitches as the CS6000i plus the 10 more which are mostly cross and satin stitches.
At the end of the day, the performance is often exactly the same and in this case reviews of the XR7700 look really good, too. In comparing the two options, it comes down to the price you can get, the usefulness of the extra presser feet, and the extra stitches. whether or not you want the additional presser feet and the added stitches.
Does that help? (sorta, kinda?) 😉
Sincerely,
Erin
Thanks, Erin: I guess it makes sense – though it seems weird to keep the same part number but provide a different machine (which is the opposite of what you discussed.)
I agree that they are the same machine. I think the Costco return policy pushes me that direction. I am buying this machine as a backup to my Janome 8077 (which I bought based on your review), so the extra feet will probably work between the two machines and getting the extra “fancy” stitches will be fun, too.
I’ve got a question on a Janome that I’ll send from that page, too.
Thanks again!
Vicki
Thanks for your review! I have a question- I’m looking for my first sewing machine, totally a beginner. I was planning to order the cs6000i but I stopped in my local retail store and they demonstrated the HS 2000. With the retailer’s sale price, that model would be about $10 more and I’d get a free lesson. My question is what’s the difference in the machines? The HS 2000 has 10 more stitches but I can’t make out any other differences. I like the fact that the cs6000i has been around for a few years and I’ve read tons of good reviews, but the HS 2000 seems so similar and it would be nice to have the retailer nearby if I ran into problems. Can you make any suggestions between these machines? Thanks!!
Abby – The answer I just published for Vicki somewhat applies to you, too. 😉 Brother does this a lot – uses the same platform and design and then calls them different things. The HS2000 is a Project Runway labeled Brother sewing machine that has a very similar layout to the Brother CS6000i. The layout is a bit reminiscent of the PC210PRW, too. They may have modeled it to fit more with the overall PRW look? Although I haven’t tried one out, the line of Brother sewing machines with this design all seem to have pretty solid consumer reviews. I think you’d do fine with the HS2000. I can’t find the manual online but I can tell by the buttons I see in the image that performance and features are very much the same as with the CS6000i – Start/Stop button, Needle Up/Down, Reverse, Speed Control, etc. I can’t see the stitches but you can always take a look at those in the store and make sure they look good to you. 😉
Sounds like a good deal to me!
Sincerely,
Erin
Thank you so much for the information! I am taking a sewing construction class at the college and they are using the PC-210 which is really easy to use. I am tempted to buy the same that machine since I’m using it several hours a week and have become use to it. I do like the price of this one much better (or its equivalent at Costco), the PC-210 will be around $350 – are there any big differences between the two machines – is the PC-210 a better quality?
Thanks for your help!
Seanna – I do love how the PC-210 is set up. I remember that every time I take a look at it again. 😉
Here are the main differences for you to consider:
Size and weight: The PC210 is slightly larger and weighs a few pounds more. It does feel a bit more “solid” as a result.
Parts: It’s hard to tell without opening the two machines up but the interior parts may be different with more plastic being used inside the CS6000i. That has not, however, hurt its ratings and reviews in the least.
Stitches: The CS6000i has 10 more stitches, two of which are additional buttonhole styles. The others are mostly decorative. The CS6000i does not, however, have the eyelet punch stitch, if that matters to you.
Accessory Storage: The flip down tray on the PC 210 is easier to access during sewing and simply more functional.
Other than that they have the same automatic buttons, come with similar hard covers and both have a six segment feed dog. Depending on the kind of sewing you do, the different sizes of the two machines might be an important factor for you.
Hope that helps a bit! 😉
Sincerely,
Erin
Thanks Erin! I decided to buy the CS6000i from Amazon – I get it tomorrow. Thanks for your help.
So welcome! I’ve been MIA for a couple of days so you should have this already. Hope you found it easy to set up and are already working away on it!
Sincerely,
Erin
Hi, Erin,
I have not sewed in over 30 years, since I was in high school–the old-fashioned home econ class. Just borrowed a friend’s Brother CS5000PRW Limited Edition Project Runway machine and fell in love with it. Now I realize it is discontinued (hence the name Limited Edition). Any thoughts on whether this CS6000i leaves out any key features I might miss compared to the one I had borrowed? I guess I am beginning to compare it to the CS6000i and the CS5500. Which gives me more?
Jeannie – If you like the CE5000PRW, you’d like the Brother CE5500PRW. They’re very much the same. This page has all the details.
However, the CS6000i is an outstanding machine and actually gives you the same features as the CE5500PRW and MORE. It includes 10 additional stitches including the quilting stippling stitch and my favorite set of operating buttons: Start/Stop button, Needle Up/Down, and the speed control option. Both machines have a six point feed dog system and a drop in bobbin. The LCD screen and buttons are in a slightly different spot but I think that would be a minor adjustment for you.
The only thing you’ll find different, really, are the stitches and the accessories. The in depth reviews on this site will let you compare accessory lists as well as pictures of the stitches so you can decide which is right for you.
Right now the CS6000i is priced about $20 more and considering that it comes with the extension table, bonus presser feet, the hard cover, more stitches, and the additional control buttons, it’s a great bargain. 😉
Sincerely,
Erin
Hi, I wanted to leave a note thanking you for the extensive research on this product. I recently purchased the Brother CS6000i through Walmart (it was the best deal I could find, plus free shipping). I am so excited to try it! It should be here sometime this week. Although I have yet to try it, after reading this article and many reviews from various websites, I am certain (and hopeful) I have made the right choice.
I have found this article to be extremely helpful, so thanks again 🙂
Renee – Glad the article helped! I think you’re going to love it! It really is an incredible deal and such a neat sewing machine. You can’t get this set of features on anything else for this price. Enjoy!
Sincerely,
Erin
Great review!!! lots of helpful info! I’ve had this machine for gosh 3 years! And I find new amazing things all the time! It’s such a great machine! I am excited to try out the sa177 presser foot! That just saved me $200!!
I am so happy to find this site. I cannot remember how I found it, but sure glad I did and I put it in my favorites. I called a Gall dealer with Brother and asked how much they were selling the CS6000i for and they said it was a dicontinued machine and did not carry it. I cannot find any information on line to validate that. Is it discontinued? No one in my area carries it locally or other. Anyway, I went ahead and ordered it from Amazon.com as I really like the reviews. I have an embroidery only machine by Janome that is new. My basic, very old machanical machine started acting up badly and I really had been wanting something new. The thing that made my decision to order on line was the post you made about finding a service representative for warranty or out of warranty work on the machine. Brother can be fixed at my Gall dealer only three miles from my house. The others were 50 miles, not too bad, but the Singer was the farthest away at 70 miles. I am still nervous about ordering on line, as I have never ordered anything like this on line. I am worried if something does not work right, do I just take it to Gall and they have to work on it according to the warranty that comes on it? Is it really that easy?
Thanks for being here, you site is awesome!
Liz
Liz – I’m glad you found us, too! 😉 According to Brother’s website, the Brother CS6000i is not a discontinued machine. It was built and marketed as an online-only machine so most of the physical Brother retailers never did carry these in stock.
Yes, if Gall showed up as a service center on the Brother service center link than you are in good shape. If you look at percentages (accounting was my major in college…), the chances of anything going wrong for you are very, very slim! 😉
Enjoy your new machine!
Erin
Thanks Erin, many hugs to you!!!!!!!!!!!!!!!
Same to you, Liz! 😉
Erin,
Please let me know if CS6000i can be used to sew stretch/spandex fabrics. My daughter has a gymnastics competition coming up and I want to make her a leotard. My old sewing mashine skips stitches and refuses to deal with that type of fabric 🙁 so I need another machine asap.
Please help! 🙂
Thank you
Margarita
Margarita – The CS6000i absolutely works with stretchy fabrics. There are even a few stitches designed specifically for working smoothly with stretch materials and the different presser feet will help, too!
Sincerely,
Erin
Dear Erin,
Thank you so much for your fast responce! I just ordered the machine from Amazon and can’t wait to receive it 🙂 Would you know what presser feet I need to use with stretch fabrics? Just want to make sure I’m using the right one if there is nothing on this subjust in the manual… If there is, don’t worry about responding, I will study the whole booklet like it’s my mortgage agreement :))))
Thank you again,
Margarita
Margarita – Congratulations! I think you’re going to love how easy this machine is to use and yet how many great features it offers!
The general presser foot might be enough but some shiny fabrics can heat up under the friction caused by fast moving presser feet so it never hurts to use a Brother SA114 Non-Stick Foot to prevent any marks from showing on fabrics with silk, spandex or lycra.
If you want to trim the fabric edges at your seam to prevent raveling, you’ll want the Brother SA177 Side Cutter foot, too.
You might want also benefit from a set of ballpoint needles like this Schmetz Ball Point Machine Needle Assortment by The Each.
Finally, IF you still find the feed dogs and presser feet struggle with the thin, stretchy fabric, use some tearaway stabilizer to add some weight to the fabric while you sew and then remove it from the material once you’re done with the seam.
Hopefully you’ll find the manual is far easier to understand than most mortgage agreements. (I think my mortgage came in its own binder!!) 😉
Enjoy!
Erin
Erin,
I can’t thank you enough!!! I think I got all the things I need and the machine actually works on my fabric! I think I am happier than I was on my wedding day 🙂
Best of luck to you.
Margarita
Need to find where I can get foot pedal for the Brother cs6000i- My sister passed away from cancer last year and left it to me.But couldn’t find the foot pedal.
Ruth – I’m also very sorry about your sister. What a horrible thing to go through. Thanks to Sean for getting an answer out to you so quickly about the foot pedal (I’m traveling and not on top of things as much as normal this week). Let us know if that works out for you!
Sincerely,
Erin
Ruth,
Brother has it direct from their Brother Mall site here:
http://www.brothermall.com/Accessories/Accessorydetail.aspx?AccessID=XD0501021
and also seems to have it the cheapest, from what I could see. If you want to shop around, you can Google search “Brother compatible foot control” with either model number XD0501021 or XC8816021 in the search (they’re both compatible according to Brother, they are out of stock on the XC8816021 and instead refer to the XD0601021, so maybe an updated model.)
Hope this is helpful and I’m so sorry for the loss of your sister.
I am interested in CS6000i and looking to buy from AMAZON.com. But, the problem is INDIA voltage is 240V AC whereas US it is 110V AC..
If AMAZON help me to give with 220Volts AC OR 240Volts AC motor in it…i would like to buy it immediately.
Amazon does not have the capability to change out the motor or voltage of a sewing machine. I know there are various adapters you can use but I’m not familiar enough with the voltage requirements and outlets in other countries to give you much advice. Good luck, though!
Sincerely,
Erin
I am looking in to buying my “first” sewing machine, as I have never owned my own. Growing up, I learned to sew on my grandmother’s White and later my mother’s very old Singer. It has been years since I have even touched one so I decided on a machine for beginners. I prefer to hand stitch my quilts, but would like to create some totes and canvas organizers. Exactly how well does this machine do with thicker fabrics? Does it struggle with stitching even with the appropriate needle?
Tara – The Brother CS6000i does really well with thick materials. As long as all settings, needle, thread, and such are geared towards the fabric being used, you should be fine. In the hundreds and hundreds of reviews online, people have used this sewing machine for multiple layers of quilt material, multiple layers of denim and canvas. In fact, I did a graph on all the users who commented on the ability of this machine to handle thick fabrics and while some people did seem to have some trouble, significantly more people mentioned the machine actually did extremely well.
Now, it’s not going to sail through layers of canvas as well as a straight stitch or commercial machine and you might have to take it slow so if you’re going to do a lot of canvas and don’t really need the extra presser feet, stitches and accessories, you might want to take a look at one of the Singer’s HD models, like the SINGER 4423 Heavy Duty Model Sewing Machine.
It’s not computerized or as fancy but it’s solid, has a buttonhole stitch, and moves faster so it can go through thicker materials.
(Feeling horrible that you had to wait this long for a response, btw. Crazy week!)
Sincerely,
Erin
Erin, you may wish to look at the Singer 44S that Walmart carries. It is the Model 4423 with three minor differences, and appears to be marketed just for Walmart. Price is about $150.
Thanks, Richard! I’ll take a look at it and add it to the list.
Let me just say that it’s been sooo helpful funding your website, I’ve been contemplating buying a new machine for weeks now after my old machine died after 2 years of off and on use (mainly making baby blankets and pillows). I’m getting back into sewing and currently looking at the Brother CS6000I, and the Janome Magnolia 7318 & Sewist 500.
I like all the feature of the Brother machine but one of the main things that concerns me about the Brother machine from what I’ve seen or rather heard in online videos is how loud the machine is. It reminds me of how noisy and irritating loud my old machine was (my husband would constantly complain about it giving him a headache). Between the noise and the thread constantly break it drove me insane and i stopped using it.
Ultimately I don’t want to have to have anther broken machine again in two years, or one that’s too difficult. If that means less pretty stitches then so be it.
Stephanie – I suppose a pair of ear plugs for your hubby just isn’t going to cut it. 😉 My craft space is too close to the living room so if I do something a bit too loud, the TV goes up in the other room and the kids’ seem to have to talk louder and then I get frazzled from the multiple layers of noise and then everyone has a headache in short order.
I don’t think you’d have to worry about the Brother breaking down in a few years, but it is certainly noisier than the Janome models you mention. Then, between the 7318 and the Sewist 500, performance and features are nearly identical. The significant difference is the additional few stitches on the Sewist 500.
Both of those machines are solid, mechanical sewing machines and should hold up well, too.
Hope that helps!
Sincerely,
Erin
Erin,
Thanks for all the wisdom you share on your website!
I just ordered the brother 6000i on your recommendation, and as I am impatiently waiting for it to arrive, I hoped to gather a few “first” project ideas. I’ve never done any sewing but I am pretty handy. Any suggestions on first projects to get the hang of things? I’m hoping to find a few ideas for at least quasi useful things… Any suggestions? Thanks!
Gigi – I do, in fact, have some great ideas for first projects!
I highly recommend the Sew Everything Workshop Book which comes with projects and tutorials. It’s like a DIY class for beginner sewers. You can read my review here: https://www.erinsayssew.com/the-sew-everything-workshop-book-for-beginners/. One of the projects in the book is for a dust cover for your sewing machine, which is a great place to start.
Or, check out this site which is a directory to all kinds of free patterns on the web: http://www.freeneedle.com/index.php. Some have really detailed instructions, videos, images…you have to sort through but there are lots of categories including home decor, baby items, and clothing ideas. There were some cute little tea coasters in the shape of a heart that would be perfect for Valentine’s Day or Mother’s Day (just around the corner!).
Enjoy!
Erin
Can Cs6000i sew on denim?! if yes, so what size of needle and what pressure foot we use??. Can sbd answer this? thanks a lot
Minnie – Yes, the CS600i handles denim. You need a size 90/14 or 100/16 needle and cotton thread 30-50 weight. You can use the general presser foot which has a “leveling button” on the back to help the presser foot get over thick, denim seams while you sew.
Hope that helps!
Sincerely,
Erin
Erin,
Thanks so much for your generosity in providing all of us with this most thorough endorsement of the Brother CS6000i. I’ve been puzzling for some time over which model to buy as my first machine. With your guidance (and a remarkable number of favorable reviews elsewhere) I have become convinced this is the best value out there. I am in awe of your generosity of spirit in answering all the inquiries posted here. You’re amazing. I’m off to Amazon. Expect to have my shiny new CS6000i by the weekend. Thank you.
David – You’re welcome! I love to know when the site has helped someone with their decision. Always makes my day!
I think you made a wise choice and you’re going to be thrilled with the ease of use and the functionality of the CS6000i. It really does provide the kinds of features and performance reserved for machines that cost at least three times as much.
Sounds like you’re going to have a fun weekend! Thanks for taking the time to comment. It’s always very much appreciated!
Enjoy!
Erin
Erin, this is in reply to your reply to my post above. First of all thank you so much, your info is greatly appreciated! I am looking at the Janome Sewist 500, one of the machines you recommended, and I like everything I read about it. And yes, I would be sewing some fabric some leather. When I sew leather, it’s pretty heavy leather. I make western riding chaps that a not split hides, they are full grain hides of somewhat varying thickness. I am looking to do something with all the fairly large scrap pieces I have left (chaps I stitch by hand) to make place mats, pillows, whatever. I do not sew a lot. Can I attach a walking foot to this machine, or would you recommend something else for the times I do sew my rather heavy leather? I understand a thin leather needle and 5 – 5 1/2 stitch length, but anything else? I am also waiting to find the Janome as refurbished at a lower price… thank you so much again, you have a great site with a wealth of information! Mimi
Mimi – Chaps! Well, that’s a first for this site. 😉 How cool is that?!
Yes, you can attach a walking foot to the Janome Sewist 500 but I almost think you’d be better with something like this: SINGER 4423 Heavy Duty Model Sewing Machine. While I don’t recommend as many Singer models as I do Janomes and Brothers, there are a few models that have done really well and this is one of them. It’s built to power through anything yet still has a nice selection of stitches and you can drop the feed dogs for other kinds of stitch work. Better yet, the price is amazing!
Take a look and let me know what you think.
Sincerely,
Erin
Erin
This website is so helpful, I started looking online for a basic machine and got very confused by the different models, reviews, etc. I thought I had settled on this Brother after reading your review, but noticed that you have mentioned that this model is the same as a number of other Brother models. I am in Australia and the Brother website has different model numbers for the computerised machines. Are you able to tell me which Australian model is the equivalent of the CS6000i?
Many thanks
Julie-Anne
Julie-Anne – It looks like the BC2500 is the Australian equivalent of the CS000i sewing machine. Brother uses the same manual to cover related machines and then includes the first few letters of each machine for which that manual works in the URL for that manual. When I bring up the manual for the BC2500, it includes the CS60 in it’s URL which means it’s the manual that also works for the CS6000i.
The two machines have similar designs, the same 60 built in stitches, and the same automated controls (start/stop button, needle up/down, and speed control).
I’m not sure that the accessory set is the same, but all else matches up nicely!
Sincerely,
Erin
Thank you so much for looking into that for me Erin, that’s really helpful.
I’ve just checked the Brother website for Australia and the BC2500 retails for $600 here! What a massive mark up! I think at that price I’ll be ordering mine from Amazon and taking the risk of not being covered by a warranty!
It did seem a little pricey in your neck of the woods. The AU site showed all the available machines in order of price so I thought it would be pretty easy to find the comparable match by scrolling for a similar price. That didn’t work. LOL!
When I try to search for online stores selling this machine, nothing comes up but might be because I’m searching from the US. You might see what you can find online or at a local retailer just to be sure. Those prices on the site might be the higher MSRP and not the true going rate for that machine. However, if it is the going rate, I’d be with you on skipping the warranty and taking the cheaper price. Just make sure the type of plug on the machine is compatible with your electricity. That stuff always confuses me. 😉
Sincerely,
Erin
Thanks for the great review. I am new to sewing and planning to buy a sewing machine.
I looked at brother machines on amazon and also on Brother’s US website. I see that a machine called CP-7500 is available both on Brother’s website as well as on Amazon. Both CS-6000i and CP-7500 sells for the same price on Amazon. I am a newbie and can’t really evaluate the differences. Could you please help?
Farhana – The CS6000i and the CP-7500 are almost identical. There are only three differences:
Design – The CS6000i is blue and boxy while the CP-7500 has pink trim and is more rounded.
Stitches – The CP-7500 has 10 more stitches and those additional stitches are all decorative so you’ll have the same set of utility stitches and stretch stitches in either machine.
Price – Sometimes they’re the same and sometimes the CP-7500 costs more.
Other than that, the Brother CP-7500 comes with all of the same accessories as the CS6000i (same presser feet, extension table and hard cover). When they’re the same or close, the CP-7500 is the better deal simply for the additional stitches.
Both are great machines that are user-friendly, easy to learn and great for beginners. Hope that helps!
Sincerely,
Erin
I’m just purchased this model from AMAZON! 😀
can’t wait for them to post it to Malaysia and start sewing. BUt… I just trigger this US machine is 110V.. oh no…can anybody tell me what is the power consumption of this machine?? (unit W)..
since there also no information in brother website & in cs6000i manual which i download just now, anybody who know this, please help.
i will looking for step down transformer and spend another $$$.. sigh
AFIF – Sorry, I don’t know the watts but, yes, this is 110V machine. The plug-in is a polarized, US plug-in where two of the prongs are flat, one wider than the other. You’ll need a converter of some sort but not sure what kind? Does the watts tell you what kind of converter you’d need?
Sincerely,
Erin
Erin, yes..
i need to know the power consumption of this machine to purchase sufficient/optimum size of transformer..
i think at this machine will stated something like this..
eg..
19.5 volt, 3.4A
—- —
i need to know the value of ‘V’ and ‘A’..
from here V x A = watt…(power)
could you help me to find this..?
AFIF – I found part of the equation and still working on the other part. It’s a 110 volt machine. Still waiting to hear back on the amps. Did you find it yet?
Thanks!
Erin
I am interested in the Brother CS6000I. I am brand new to sewing, but would like to learn for my kids projects. The question is – I’d also like to be able to do a lot of projects that involve sewing PAPER – esp cardstock. Can this sewing machine handle that? Is there another under $200 machine that could handle it better but could also be a good little entry machine that will allow me to learn how to sew things like children’s clothes and costumes? Thank you so so much for your input!!
Katharine
Katharine – Yes, the CS6000i will sew on paper and card stock. In fact, someone had asked a similar question on another page not too long ago and that led me to do some investigating. There are beautiful machine-sewn card projects. I was amazed at how pretty they look! Any of the machines I’ve reviewed can sew paper. Just don’t sew through glue or any kind of sticky material on the paper, change your needle often, and clean lint out from the bobbin case frequently and you’ll be in fine shape.
Sincerely,
Erin
Thank you SO much for your fast reply! I am buying it today. I really appreciate the input and advice!
Katharine
I’m new to sewing, and love this machine too. It’s so easy to use! However, my mom went over some stitching on some towels, and bent a needle. I need to get a stash of replacements. Where do I find those (in-store? Amazon (I have Prime, so it’s usually even easier for me to order online)? What size do I need? Do I need different types for different thicknesses? As a newby, I simply used what came with this. I plan on doing some baby burp clothes so I need a strong needle as the base of that project is cloth baby diapers with the thicker middle portion. Any help would be appreciated!
Janna – You can get sewing machine needles online, like these at Amazon: Schmetz Universal Machine Needles 5/Pk- Size 11/75, or at your local sewing goods store. You probably want a selection of different sizes: some size 75/11 which covers all thin and medium fabrics, a couple of 90/14 for slightly heaver fabrics (should be sufficient for your baby diapers, I would think), and a couple of 100/16 for heavy denim.
So glad you like this machine. It’s such a great deal!
Sincerely,
Erin
So I have been comparing the sq9000 to this machine and it seems to have some more things to offer.I sew not a wide range of things but things like design really matter its only a 50 dollar difference.But this machine is so greatly spoken of i don’t know what to decide on.I did look at the reviews for this machine and it looks like its just basic and doe snot last as long.I think the Sq9000 seems like a better deal though what should i do?Thanks for the amazing website!
The SQ9000 is a sewing machine only while the SE-400 also does embroidery. The best price today on the SE-400 is ~$370 while the best price I can find on the SQ9000 is ~$150, less the 1/2 the price of the SE-400. Were you pricing new machines?
cheers,
Rick
I’m sorry for the misunderstanding i actually don’t need something like a embroidery machine i was just saying that the SQ9000 has more decorative stitches than the CS6000I and has an extra foot and I’m not really worried about it being an easy use so that’s why i wanted to know if the Sq9000 would be better for me.
Sorry Suzie … I somehow got on the wrong review page. I thought this was the SE-400 page. 😉
cheers,
Rick
I LOVE this site… I am looking into buying my first sewing machine (I’ve never even had Home Ec class, but I’m crafty and want a new hobby) and this site is SOOOO INCREDIBLE. I feel like I can buy with complete confidence and the reviews are so comprehensive!
Thank you for the peace of mind!
Hi Erin!
I can’t begin to say how much I appreciate your website and all the info you’ve packed into it! Like many others, I have narrowed down my search to the CS6000i or the CP7500, but I have a couple of questions I didn’t see answered already. I see they both come with a hard cover and you mentioned in the CP7500 review the the hard cover has a cut out in the top for the handle to come through. Does the hard cover for the CS6000i also have that cut out or is it more of a dust cover? Also, do both machines have the same fold out spool pin? And last of all, in the Machine Wizard head to head comparison I noticed that it said the CS6000i has stitch customization but the CP7500 does not – Can you tell me what stitch customization is exactly? ( This is all new to me! )
I’m leaning toward purchasing the CP7500 for the extra stitches, but I’m trying to figure out if these things would sway me to the Cs6000i.
Thanks so much for your input!
Kathy
Hello,
Is this available in Canada?
Marilyn,
Try this link to locate a Brother Sewing machine retailer near you in Canada.
http://www.brother.ca/en/customer_care/wheretobuy.asp
cheers,
Rick
Thank you so much for this site. I have not sewn since high school and I wanted to start sewing again (cushions, pillows, altering jeans, making costumes, etc.). I’ve read through many reviews and have narrowed it down to four: CS6000i, CE5500PRW, CP7500, and I saw that Walmart has the CE8080PRW.
I was wondering, what would you choose between the Brother CP7500 and CE8080PRW?
I was also wondering what stich customization was because when I compared the CS6000i, CE5500PRW, and the CP7500, the CP7500 did not have that feature.
Any advice would be much appreciated. Thank you.
Dear Reader,
I read the comments and review of the Brother XS6000i before buying it. I am 73 years old and have had MANY sewing machines over the years, starting out with a treadle machine in the mid-forties. I wanted a simple machine to supplement my horrendously expensive sewing/embroidery machine since I often work on more than one project at a time) My, how they have changed. I was rather dubious about buying the CS6000i because of the price. (“You get what you pay for”, etc…)But, most of the reviews were positive and it had the basic features I wanted: needle down, drop-in bobbin, ability to lengthen or widen a stitch, drop feeddogs, low shank, and a few basic decorative stitches. The weight is not a problem since it is well-balanced. My ultra-expensive, top of the line sewing/embroidery machine weighs about 45 pounds and I have to call my husband to move it! (The latest model weighs in at almost 70 pounds!!!!) The little table that comes with it takes a bit of adjusting of the legs to get it just right but it is certainly a nice accessory and quite sturdy! I feel that most of the people that have had problems are not threading the machine correctly or loading the bobbin correctly. The LAST thing you want to do is start twirling the tension dial!!! Trust me on this one. Also, the manual that comes with it is for at least three different Brother models, similar, but differing in details. Be sure you are using the right instructions by reading the manual carefully. Also, make sure that the thread comes off the thread spool from the front (as shown in the manual), not the back. Although this seems a rather picky point, it is not. It is dependent on how threads are wound and does make a difference. The only thing I would like to see is the ability to mirror the decorative stitches. Be aware that the “quilting stitch” will not look like a true quilting stitch unless you use invisible thread in either the top or the bobbin; otherwise, you don’t get those apparent spaces between the stitches like in hand quilting. (I hate that invisible nylon thread; can’t see it with my ancient eyes!) Also, the machine “feels” right…sews nicely, no banging or loud noise other than that of the mechanical up and down of the needle shaft. It sews a very pretty stitch and does so consistently. I really like this machine! (Although it truly troubles me that I am not supposed to oil (or grease the gears) like so many machines I have had in the past. But, hey! if they use plastic like that used by NASA for spaceships, I better get used to this new technology.) I predict that this particular Brother model may well become the legendary Featherweight of the future.
I just bought the cs-6000i. It is as easy to use as reviewed & I’m quite happy with all the features. It is my second brother sewing machine. I just have one problem with it. It keeps dropping stitches. I’ve tried changing tension and sewing at the slowest speed & cleaning out the bobbin case area but it still skips stitches. Do you have any other practical advice? ( the threads I use are the same as the ones I use for my other first sewing machine ) Help please. So frustrated.
I’ve been trying to figure out the best sewing machine for my 15 year old. She’s been sewing for a few years during her lessons but not at home. I had fixed up my old Singer from the early 70’s being told it was well made and better than todays. I hated it when I was younger, it bunched up thread and jammed (probably user error but frustrating). I gave it to my daughter but she has not enjoyed it. It seems to keep breaking. I’ve decided to get her a more user friendly machine like the Brother’s 6000 or Singer heavy duty 4223. My local store says they like the Singer one better and the Brother 6000 can’t handle denim. The reviews are mixed on this but the Brother reviews in general are more appealing. What do you think?
Thank you soooooooo much! I’m 16 years old but don’t let my age fool you. My freinds say i act a lot like an elder because I crochet and I read a LOT more than the average teenager, but anyway I wanted to get into quilting but i didn’t know where to start so one day my mom said to me that she had her sewing machine in the basement she use to use when she was younger. My mom is 51 so you can just imagine how old this machine was, not considering the fact that my uncle had it first and he is older than my mother. This sewing machine was so old that it wouldn’t work!!! The only thing that workrd was the motor. It was all metal in the inside and she hadn’t used it in forever so it was rusted and would not move at all. I was so sad when i found that out. Not to mention how heavy it was! Im talking about the wieght of two butter ball turkeys being carried in one hand! if that is even possible but yea so just recently i decided to gainn hope in learning how to sewand quilt agian so i’ve been looking online for a sewing machine i went on Amazon and saw one for $37.00 i figured good deal but before i bought it i bought Sewing for Dummies (don’t judge me) to teach me how to sew then i was going to get the sewing machine. BUt then I saw your review and i read the one on the Brother CP6500 and i liked it this is until i clicked on the Brother CS6000i and i knew i had to have this one becauseof the cute gadgets that come along with it. It makes the $37.00 one i was going to buy look like a toy sewing machine for a child. but anyways im giving thanks to you on writing this review for those who wanted an up close an peronal opinnion on this sewing machine.
Does the brother sq900 and sq9050 and cs6000i all come with cases?If so are they hard or just dust covers?Is there any thing that i wont be getting if i buy the sq9050 apposed to buying the sq9000 or cs6000i.
Te SQ9050 does not come with any case or cover. I left a list of what it comes with over on the SQ9000 page.
I just purchased the CS6000i because of your reviews and I am super stoked. I’m a VERY beginner sewer but I love clothes and am hoping to start making my own stuff in the future. That you SO MUCH for your help and guidance. This website has been amazing.
Dear Erin,
Thanks a ton for the very informative information on Brother CS6000i 60-Stitch Computerized machine. My primary need is to hem jeans and etc. After reading a lots of reviews and comparing it with other machines by Brothers and other brands, this one seems to stand out for me. You have answered a crucial question for me, which is there is no need to send this machine for oil maintenance (Hooray!).
Please feel free to recommend me other good sewing machines that cost less than this one for my basic need. Thanks.
Happy New Year!
I’ve received the Brother CS6000i computerized sewing machine today via Amazon.com. The largest needle included was size 14. I couldn’t find a size 16 needle in the package as you’ve described above.
I guess that I have to get a size 16 or 18 needle my jeans hemming.
Could you advise me what kind of thread is suitable for hemming jeans? Thanks.
I would use a top stitching or upholstery thread with denim.
cheers,
Rick
Hi Rick,
Thanks for your reply.
I have another question regarding the the thread style from the original Kut Jeans (http://farm8.staticflickr.com/7003/6697875141_9c84f5fbe1_b.jpg). The original thread is six times of a single thread in thickness. How do I achieve that on my sewing machine (sorry, I have never used a sewing machine before)? Thanks.
Stitch style 02 on the cs6000i will probably do what you want. It stitches forward then back then forward to put three threads in one stitch. It would give the effect of tripling the ‘guage’ of your thread.
cheers,
Rick
Thank you for such a wonderful helpful website!
We are expecting our first child this summer and I am looking to buy a machine that will be able to make hooded blankets, hem jeans, quilt, sew basic baby clothes, possibly make a meitei carrier, and hopefully more crafts to come!
Will this be a good choice for a beginning mother-to-be?!
Glad I found this! Ok, so for starters, I was in the middle of free-motion quilting on a Brother LS-2125i when the motor blew. I had it for 3 yrs (have only been sewing since this so it was my first) and it was under $90 I believe. I loved it for that time, but I’m a little nervous about buying another brother. The reviews on this are amazing and it seems like the best bet for money. My husband has told me I can go up $400 for a machine, but I’m too frugal for that. My questions are: how is this machine longterm? Can it hold up for serious free motion quilting? I want something I can own for a looong time and that can be versatile. Locally, there is someone selling a used Pfaff made in the 1990s for $250 (retailed for over $1000 at the time). Would you consider ever buying a used machine from that long ago? Yikes, I’m so in need of help!
Is this machine Brother CS6000I available in Pakistan.. I am beginner in sewing.. I have always used a manual sewing machine and not a computerized one.. will this machine be easy for me.. i am young and can adjust to technology. what will be its price in Pakistan?
Sarah – I’m finding a couple of articles online that suggest that the Brother CS6000i is available in Pakistan for roughly the same price in US dollars as it is available for here in the US. However, I’m not finding exactly WHERE you’d buy it from in Pakistan. I don’t know what your electricity base is there, either, so if you don’t buy it in Pakistan you may end up having to buy a transformer to fit the outlet and plug in your country. I did find that Amazon.com in the US has international shipping but there are a number of restrictions and regulations which you can read about here: Amazon International Shipping.
Sincerely,
Erin
I have this sewing machine, and while it generally is great, I have one question: how do I oil it? I am very good about cleaning my machine as much as I can but it needs to be oiled. It is so loud whenever I use it, people can hear it a floor below me. My neighbors have complained about the noise, and I can hear from the way that it is running that it needs to be oiled, but the only thing I can discover is that you are not supposed to oil it. I don’t see how that is possible as it has been loud and in need of oil since I first bought it. I am not sure as to what to do to fix this problem. I use my machine at least 4 times a week working on projects so it is something that needs to be addressed. Do you have any comments or suggestions as to what I should do?
Thanks for any help you can give me…
Tressa – Yes, some of today’s machines don’t need oil because they use different materials inside the bobbin case. In fact, oil could hurt your machine, if applied.
Instead, you first want to clean the bobbin case thoroughly. Use a soft brush to reach every possible speck of dust, lint, or debris. Replace your bobbin and make sure you’re using the exact kind of bobbin specified by the manual. If you try to substitute the wrong size or type of bobbin, this can cause problems. Then re-thread your top and bottom threads making sure you’ve followed the instructions in the manual. Sometimes, you’ll think it’s perfectly threaded when just one little step is out of sync and that can make funny things happen with your machine.
Give all of those steps a shot and see if that makes a difference. If that doesn’t work, you may need to have someone take a look at the bobbin case itself.
Good luck!
Sincerely,
Erin
Thank you for all the great info!!! You have really made the researching process easier. I’m sorry if I overlooked this in the post or replies, but I’m wondering if this model (or the XR7700 from Costco which I’m leaning towards for the return policy) is metal inside or has metal parts? I will be sewing garments and light household decor. I just want to make sure I invest in a solid machine. I have only sewn on a very old Singer Stylist 833 which badly needs servicing but I figure for about the same service cost I would get a new machine with an automatic buttonhole feature and some decorative stitches! Thanks again!
Maureen – Thanks for the compliment. That’s been the goal of this site – to make your comparisons as easy as possible. 😉
Even the cheaper Brother sewing machines have both metal and plastic interior parts. The important mechanisms are all metal but some of the housing around those parts and some support structures are plastic. The plastic is as sturdy as the exterior plastic found on most sewing machines today and meant to withstand a lot of abuse.
Those extra decorative stitches are so much more affordable today than they used to be, aren’t they? Pretty neat!
Good luck!
Sincerely,
Erin
Hi Erin, your website is very helpful but I still need help. I have a 13 year old daughter who just took sewing in school and really enjoyed it and now wants a sewing machine for her birthday. I’m leaning towards the brother cs6000i. What are your thoughts or suggestions? Thanks for any input you might have!
Mary
Mary – I think the CS6000i would be a great match for your daughter. She’s certainly old enough to understand the controls (teenagers have some natural instinct for buttons and computers these days!) and this one is very easy to set up and use. More importantly, it has some features that will make sewing easy – a drop-in bobbin, the Start/Stop button and the speed control slider. Those options alone are some of the ones I recommend a lot anyway but even more so for kids. Being able to slow the machine will let her take things nice and easy while she works on getting to know the machine.
In addition, she’s not going to run out of stitches to play with. This means she’s not going to outgrow the machine any time soon. There are enough stitches in every category – utility, stretch, quilting, and decorative – that she’ll be able to try almost anything without worrying that the machine isn’t capable. For the set of accessories at this price, too, there’s almost no comparison (except for its “twins”, the CP6500 and CP7500 which have almost the same thing but come in pink trim: see the side by side details here).
The CS6000i platform has been around for years and continues to be one of (if not THE) most popular Brother sewing machines for anyone just starting out.
Good luck!
Sincerely,
Erin
Thank you so much for your help, I’ll be ordering cs6000i today!
Hi Erin,
Thank you so much for your website; it’s awesome.
I am considering buying either the cs6000i or the XR9500PRW computerized sewing machine. I am an experienced sewer of 40 years but I would like to buy one for my 28 year old daughter who has sewn very little and wants to do dress/clothes sewing.
Can you compare the two machines for me please, and give me your suggestion? Does the XR9500PRW have as good a track record as the cs6000i?
Thanks so much.
Lynn – Just wanted you to know I saw this and off to do some final fact checking. Be back in just a bit with some thoughts on the two for you. 😉
Sincerely,
Erin
Lynn – I knew I had some information on comparing these two buried somewhere here. The XR9500PRW is the Project Runway labeled version of the Brother SQ9050 and the 9050 is the updated model of the SQ9000. All 3 even use the same manual.
Yes, the XR9500PRW (under all of it’s different model numbers) has a great track record and while it doesn’t have the number of reviews that the CS6000i has, there are still a lot of them and the ratings hold steady. In terms of quality, they’re identical. I’d base the decision between the two exclusively on the stitches, feature differences, and available price.
There are a couple of key differences between the two that favor the XR9500PRW:
1) Stronger feed dog (7 pt vs 6 pt)
2) Letter font
3) Upper and lower thread sensors (the CS6000i does not have these)
4) More stitches
Considering you mentioned that one of your daughter’s main uses would be for making clothes, she’ll get a few extra features on the XR9500PRW that will give her better fabric control, more stitches, and thread breakage warnings.
Hope that’s what you were after! 😉
Sincerely,
Erin
Erin,
Thanks so much for your quick response. Think I will go with the XR9500PRW.
It costs roughly around $199.00 now. Have you experienced that the machines go on sale as you get closer to Christmas?
Lynn
Lynn – The Christmas question is a tough one. Some machines go down but for the past two years I’d seen a couple of them go up. Usually the most popular ones like the CS6000i and the SE400. May have to do with whatever inventories they have. I noticed at one point that if Walmart ran out, Amazon upped their prices. 🙁 Most, however, stay roughly the same.
Sincerely,
Erin
Erin,
Thanks so much for all your help and the awesome work you do for us on this webpage.
Lynn
So very glad I could help, Lynn! Good luck!
Hi Erin,
Thanks so much for offering this website! A hom-ec class 30 years ago is my only sewing experience. I have been looking at the Brother cs6000i and the Janome Gem Gold 660. My plans for a sewing machine are mostly household projects (curtains, pillows, cushion covers). I plan on taking a reupholstering class and will need a machine that can handle upholstery fabrics for the cushion and the ability to do some piping and maybe zippers (considering I can manage to learn those). I am technologically oriented and drawn to the Brother for that reason, but am concerned about the negative reviews on Amazon compared to no negative reviews for the Janome. Do you think as a techie I would regret going with a mechanical machine? Or is the quality far better and worth sacrificing some bells and whistles? Are there other machines I should be considering? I want to stay below $200 if possible.
Thanks,
Diane
Diane – I do understand the draw of those computerized machines. 😉 Based on the kinds of sewing that you describe, though, while I think the CS6000i would hold up for some of it, I think you’d appreciate the power and construction of a Janome better in the long run. My only concern with the Janome Jem Gold for YOU is that you might find it too small for those bulky reupholstering projects. There are a couple of options I’d throw in the mix:
1) Janome 2212 – You get a couple of extra stitches and a couple of inches more in length. Both come with 3 presser foot but the 2212 comes with the Blind Hem instead of the Overedge you get with the Jem.
2) The Janome 15822 Hello Kitty (I reviewed here) – Now, I know, it’s a Hello Kitty machine. 😉 BUT, it is almost identical to the Janome Sewist 500 except that it has a slightly less powerful feed dog and the price is far better. It looks like a toy but it’s not. It’s larger than the other two, as well, by another couple of inches so you’d have more workspace.
These were options under the $200 mark. If you were to spend about $100 more, I’d go with the Janome 8077 (identical to the Janome Magnolia 7330 but cheaper and without the flowers) or the Janome HD1000.
Some things to think about!
Sincerely,
Erin
Thanks for the great suggestions. I will look into those. I like what I am learning about the Janomes from here and elsewhere. Why do you think it is that Consumer Reports gives the Magnolia such a low rating?
Diane – I haven’t seen the Consumer Reports on the Magnolia and can’t imagine why they’d give it a low review. Was it the 7330? I happen to have that one and it’s a wonderful machine. The only thing I could possibly imagine them dinging it for would be the price as you can get the Janome 8077, which is identical, for less money.
Sincerely,
Erin
Hi Erin,
It was the Magnolia 7312. It was the lowest rated of the mechanical models category. Maybe it’s not that closely related to the computerized Magnolia despite sharing a name?? Pfaff Select 3.0 and 4.0 were the top 2 in that category and Brother XL2600i was third.
The top 3 in the electronic/computerized category were Bernina Activa 230PE, Brother Innov-is 40 Project Runway (their best buy), and Brother Innov-is 80.
Anyway, glad I found my way here because there weren’t that many tested by consumer reports in my price range. I think I am going to go with the Janome 8077 thanks to your suggestions. Just have to pull the trigger!
Thanks again!
Diane
Diane – Ah! The 7312. That model is pretty small and that might have been some of the reason for the lower rating. It works very well but the throat area is very narrow and rounded so the design eats up some space.
It’s very different from the 7330 so there’s no cross-over in that rating and the one for the 7330. The 8077 is a great machine and will last you a long time. 😉
Sincerely,
Erin
What is the difference between the brother cs6000i and the brother sc6600A machines? I am looking to replace a singer touch & sew 770 machine. It seems cheaper to replace instead of repairing. the singer has bobbin issues.
Thanks,
Janet
Janet – Looks like the SC6600A is the Sears/KMart version of the CS6000i. The main differences are:
1) CS6000i has the needle up down button, speed control, and the start/stop button while the SC6600A does not
2) SC6600A comes with a ball point needle which the CS6000i does not have (but can always be purchased separately)
3) CS6000i comes with the extension table and cover which the SC6600A does not have
All of the stitches are the same, the size is the same, and the included presser feet are the same. Amazon’s price on the CS6000i is currently $10 lower than the Sears/KMart price and the CS6000i comes with more features.
The look of the two machines is different, too, of course, but the shape of the SC6600A looks identical to the Brother CP-6500 which is the newer version of the CS6000i.
Good luck with your upgrade decision and I’m sure you’ll be thrilled to get away from those bobbin issues! 😉
Sincerely,
Erin
What a great job on this website!
I went ahead and ordered the CS60001 from Amazon on Nov.3rd and except it by the 14th. I came to the decision after reading many reviews on several different models/brands. Your very detailed review and comparison is what really pushed me over the edge!! Thank you!!
I just re-read your review along with every comment following and now have a bit of confusion here (nothing new lol). If I understand right, your review listed “Automatic Tension” and also found it mentioned again in reply to one of the comments. However at retailer websites, the product descriptions have the tension described as “manual”….no automatic tension’ thus my confusion LOL!!
Lastly, I’ve been reading about needle/throat plates and am wondering if you know which plate I should expect in the box. I am a newbie, but if I understand correctly I will need a zigzag plate in order to adjust needle position if I want a 1/4” seam for piecing. I would like to get it ordered now if necessary. Thanks a bunch 🙂
Vera – You’re right, the Brother CS6000i is a manual tension machine with a dial for adjustment purposes. For some reason, I have found a few instances where I’ve noted that incorrectly but thought I’d caught them all. I’ll modify this post to show the correct information.
As for the needle plate, you shouldn’t need to order a new one. The CS6000i comes with a 7mm zigzag needle plate attached. You should be in good shape!
Have fun with your new machine. I’m so glad the site was able to help you with your decision. Feels good to have finally chosen one, right? 😉
Sincerely,
Erin
Hi Erin!
I am new to this site…I’m not sure if you still answer any posts (the last time you replied to notes seems to have been a year ago). Crossing my fingers that you will see this as I am totally confused!
So here we go:
I am NEW at sewing and would like a machine that is easy to use but that will give me years of fun (I don’t want to outgrow it too fast!). The main projects I’d like to start with are pillows, curtains, hemming, stitching on cards…but also “embroider” some names or a phrase on baby clothes.
So I saw a few machines that seem great:
Brother CS6000i
Brother CP-7500
Brother SE400 Embroidery
Singer 7256
Singer 9960 Quantum Stylist
My budget is anywhere up to 350ish.
I would like to know if the SE400 allows me to upload my own fonts so I can embroider names/phrases that have my own style? If so this seems like a good machine except for the reviews that say that advanced sewers do not like this machine…!?!?
I’d like one that comes with accessories I’d need.. (and the possibility of adding that cutter foot…?)
I’ve been looking at all your reviews (which are AWESOME by the way!!) but am just getting more and more indecisive… 🙁
Please help…I need to buy/order one this weekend so I can start my sister’s baby’s mobile and other room decorations I promised her…and the baby is here in a little over a month! 🙂
I hope to hear from you soon 🙂
Many thanks!!!
Julie
Julie – Oh, yes, I’ve been neglecting my poor site and visitors but I do see everything that comes through the site each day. Just got tied up in other things for awhile but I’ve been trying to clear my plate to get back to this site. When I saw your post come through, I knew I had to get back here and answer you. I’m so familiar with that period of indecisiveness!
You’ve listed some of my favorite machines but you mention a couple of things that I think clearly point to you best enjoying two of those items on your list the most – the Brother SE400 or the Singer 9960. The reasons I suggest one of those two have to do with the amount of additional flexibility you’ll have for fun stitches, the longevity of the machine itself, you’ll never outgrow either one, the overall size of the machines works well with larger projects, and because those two offer the most options for decorating fun baby items.
Yes, you can upload your own fonts onto the Brother SE400 but you’d have to design the fonts and put them in the proper file type so that the computer in the sewing machine can read them. There are lots of fonts available online (some free ones and some paid) that you can download and use with the SE400.
Between the two machines, there are some key differences that may help you make your decision:
* The Singer 9960 has a stronger motor and a more sophisticated control panel
* The Brother SE400 is a true combination embroidery and sewing machine so you can do full embroidery and because you can upload new designs your embroidery pattern choices are endless
If you want to do any embroidery on a regular basis, get the SE400. If not, get the Singer 9960.
Let me know if you have other questions but I hope this helps you narrow down those choices and good luck with the baby projects! A new niece or nephew is so much fun (and what a great sister you are for helping out)!
Sincerely,
Erin
Hi Erin!
Thank you SO SO SO much for your help! You are really saving me 🙂
It seems maybe the Singer will work best for me as I am a bit scared that the SE400 might be a bit”too gimicky” (please do say if I am wrong).
So I do however have a couple of extra questions:
1. What else do you suggest I order at the same time to be able to get my 5 pillows and mobiles done (I have all the fabric needed…)…any spare needles? Thread? Zipper foot?
2. Does the singer 9960 have a “cutter foot” to make edges nice and clean?
3. This model doesn’t come with a zipper foot, right? Is this 100% necessary to be able to sew on zippers. (Seems I’m trying to complicate my 1st projects here 😉
4. The fact the Singer has the drop feed would allow me to do some basic embroidery I guess? I won’t be doing things that are too sophisticated 😉
5. Also it seems that Brother AND Singer machines aren’t really compatible if I move to Europe or elsewhere (which will happen in 3-4 years maximum)and I’d like to know that I can keep my first machine for a while and not change in a couple of years…are any compatible?
I am so sorry I am bothering you with a million questions…!!
Thank you so much for taking time to help me 🙂 I’m so glad I found this wonderful website!!
Sincerely,
Julie
Ps. I do what I can for my sister because she has been the best big sister a little sister could ever dream of having 🙂
Julie,
The questions aren’t a problem. 😉
1. What else do you suggest I order at the same time to be able to get my 5 pillows and mobiles done (I have all the fabric needed…)…any spare needles? Thread? Zipper foot?
Absolutely get extra needles. You never know when you’ll bend one or need a new one and you should change them out in between projects to make sure you’re using a fine point that hasn’t been dulled. It’s horrible to be in the middle of a project, need a new needle and find you’re out (and it’s 1am…).
2. Does the singer 9960 have a “cutter foot” to make edges nice and clean?
Singer does have a side cutter presser foot that fits their low shank machines (like this one) but it isn’t included. There’s also a generic version for low shank machines that might be cheaper. When looking, you want one that is a 7mm, low shank side cutter presser foot attachment.
3. This model doesn’t come with a zipper foot, right? Is this 100% necessary to be able to sew on zippers.
The Singer 9960 does come with a zipper foot so you won’t need to buy one. And, yes, it makes zippers much easier!
4. The fact the Singer has the drop feed would allow me to do some basic embroidery I guess? I won’t be doing things that are too sophisticated 😉
Right – you can lower the feed dogs and then you control moving the fabric around so you can stitch as you need and do what’s called “free-hand” embroidery.
5. Also it seems that Brother AND Singer machines aren’t really compatible if I move to Europe or elsewhere (which will happen in 3-4 years maximum)and I’d like to know that I can keep my first machine for a while and not change in a couple of years…are any compatible?
The part that is not compatible is the plug but you may find an adapter that will allow you to use the machine in Europe. If you know where you’re going to go (and how fun it sounds to live in Europe for awhile!), check the electrical requirements and outlet types in that country and then look for an adapter for US electronics that is compatible with the country and your sewing machine.
Oh, I have a little sis that sounds just like you. She may be coming to visit the end of this month and I can’t wait!
Sincerely,
Erin
Hi Erin 🙂
thank you so much…voila! I have ordered my super machine!! I cannot wait to learn sewing!! 🙂
Having big sisters is the ultimate best…Your little sister will agree with me I am sure 🙂
Thanks again SO much for all your super advice! I will definitely tell you how it goes in a few days 😉
thanks again!
Julie
I have not sewn for years, but my daughter is in a sorority so I want to start making her letters:) she is also living in the house next year and I want to decorate some sheet sets for her and her roommate. I tried out the Brother 400 but the embroidery hoop was too small, so I thinking of getting 2 separate machines one for embroidery the brother 770 what are your thoughts on that machine? Also for sewing machines I am trying to compare the following PC420PRW, CS6000i,HC1850,XR9500PRW, I want a machine to sew, and quilt basically. I have been wanting to quilt for a long time. the easier the better, I know the price difference in these machines is large, but does either one make sure sense. Thanks so much for your time. Tammy
I have this machine and I love it. I’m a beginner. Like a real beginner. Your review was amazing. I have question or two. What needle to you recommend quilting with? Also you mentioned there are 2 preset stitches that are 1/4, which are those? Thanks so much!
Hi Erin,
I love this site and thank you for all of this very helpful information. I’m looking to buy my first sewing machine as well asap. I haven’t sewn a thing (except by hand in 10 years!! I’m looking for a machine to handle home decor projects (lots of drapery and upholstery projects for my very old house. I want a machine to grow with me as well as I’m getting a ton of requests for drapes already. I’m very overwhelmed. Do you recommend the brother 6000i or the singer heavy duty? Which Janome machines would be good for my project needs? Thanks in advance for your response.
Andrea
Hi Erin,
I just wanted to check back in and I decided to get the brother cp7500. I just got it yesterday and I look forward to playing with it today!!!
Andrea – Oh, thank you for letting me know! I think you’re going to love it! I’m so sorry I didn’t respond to earlier messages. I’ve been buried in a project for this site that is eating up all my spare time but it’s got to be done so I can keep growing this site. You’re a patient angel to have kept up with me. 😉
Enjoy the play time! Once my project is wrapped up and my boys are out of school (next week), I’ve got a few sewing projects begging for my attention I’m looking forward to. We’ll have to compare notes and project pictures.
Thank you!
Hello Erin. how are you. I’m a beginner but been taking free classes online. now I like to know. which one is easier and better the Brother 100-Stitch Computerized Sewing Machine with Alphabet Font-SQ9050 or the brother CSI6000i or do I need to get something better I been reading reviews comparing them, but not sure which one and I hear reviews about some had trouble with the SQ9050 some didn\t and was the same thing about the CSI6000i some found it easier. some said it didn’t last. now I have the Sq9050. does this sewing machine can sewed on demin making purses out of jean and corduroy etc. wouldn’t want to break the needle. really wanted the CSI6000i but they don’t have it here in canada not where I’m from. only in the states, just want something simple. and my eye’s aren’t so good to see when I thread it.
Anne, I haven’t had a chance to look into some of the online sewing courses but I think that’s such a great idea. Considering how limited time seems in our calendars these days, getting to learn something at home on your own schedule is a nice option.
The Brother CP-7500 and the CS6000i are the same machine with different exterior designs so if you can’t get the one in Canada, go for the other.
Between those two and the SQ9050 there are two big differences to keep in mind that should help you with your decision. The SQ9050 has a 7 piece feed dog instead of a 6 like the other two so you’ll have a bit more control with thicker fabrics. It’s also the only model of those three that comes with the font stitches if you want to do any monogramming.
All three can handle denim and corduroy but make sure to use the right needle/thread combination and change the needle regularly. However, if ALL of your work was going to be with very heavy materials you might look at something built just to handle heavy fabrics like one of the Singer HD machines.
Thanks!
Hello again or do I need to get this one Brother CP-7500 Computerized Sewing Machine. please help me, I’m very slow.
Hi, Erin. I hope all’s well with you and your family. I just wanted to let you know that I used your website extensively for researching sewing machines, and I ended up buying one (a Janome DC1050) based heavily on the information you provided on your site –information that I couldn’t seem to find elsewhere, by the way. I just got back from ordering the machine from a local dealer, and I should be picking it up within the next week or two. I appreciate what you’re doing, and I hope you’re able to continue doing it.
Ray – Oh, you made my day! I’ve been working hard on the guts of the site recently…all the little things behind the scenes that make it tick. There were some pieces I needed to get cleaned up in order to keep going and I think I’ve almost got those done. My plans are most certainly to get back to it! You’ve given me the nudge I needed at the moment because that behind the scenes stuff isn’t always fun. 😉
Very excited for you and your new machine – that’s a great one! I’m glad the site was able to help you. Take care and enjoy!
Sincerely,
Erin
Erin,
Just wanted to thank you for this site. I wish I would have discovered it earlier as it would have certainly made picking a new sewing machine much less stressful. I am the full time caregiver for my husband who has dementia. In the evening (after he is in bed)I enjoy a few hours of “my time” and am wanting to start quilting. Toward that end I needed to buy a new machine as my old Singer is over 40 years old and finally bit the dust. I agonized over which machine to purchase that would fit my budget, and finally decided to go with the Brother CS6000i. I ordered it from Amazon two days ago, and this morning started second guessing myself. Finding your site and reading your reviews have reassured me. Thank you so much. Am really looking forward to receiving this machine and learning to enjoy sewing again.
Elaine – Oh, that me time is very important with what you’ve got on your plate. I’m glad I could put your mind at ease. My mother’s machine is about the age of your Singer and when she had a chance to use my machine with some of the newer controls and features she had a blast. I think you’re really going to enjoy how simple some of the most routine sewing machine tasks are on the CS6000i and you’ll be quilting away as soon as it shows up. Thank you so much for stopping to comment. Means a lot to me that this site was helpful to you! Enjoy that quilting! 😉
Sincerely,
Erin
Your thoughts on deciding between the Brother CS6000i or Janome 2122? For daughter age 35, who has never sewn before.
Dixie – the Janome is going to have stronger overall machine construction so it *should* last longer with regular maintenance. It’s also mechanical so there are fewer parts that could break down or require maintenance.
It does, however, have far fewer stitches and less automation.
So, to choose between the two I’d consider what kind of sewing your daughter might do and whether or not you think she’s going to want to use any of the decorative stitches in her crafts. The CS6000i will hold up – I don’t mean to imply that it won’t by saying the Janome is stronger. It’s just that the CS6000i might not last 20 years whereas the Janome should be just like new in 20 years.
While it mostly comes down to flexibility vs. longevity between these two there are also some minor differences. The stitch width and length are limited to 5mm and 4mm respectively, the buttonhole on the Janome is a 4 step process instead of 1, and there are fewer included accessories.
My thoughts on the two, anyway. Hope that gives you some things to consider.
Thanks
Sincerely,
Erin
Based on your very first paragraph… “The Brother CS6000i is hands down the best deal for under $200 and has high marks from beginners and experienced seamstresses alike. The combination of low price and loads of features makes it one of the best value buys on the market.”…..do you still lean this way? In your opinion, does this machine still beat out the Janome 2122, Janome 7318, and the Brother XR9500PRW? As stated in an earlier submittal, I am looking to buy a sewing machine for Christmas for my 35 year old daughter. She has no sewing experience, but has expressed an interest in having a sewing machine. I think she is probably going to use it mostly for home décor, crafts, etc., but who knows, she might get addicted and move on to more serious things! I reiterate what so many have said….you have a great gift for giving wonderful feedback on this site. Keep up the good work!
Dixie – Yes, for the price I still think this is one of the best deals. I’m comparing the total package of accessories, automation, and stitch selection when I say this. There are certainly things about Janome machines that are better than Brother machines (internal construction and stitch mechanisms) and that’s what is reflected in the price difference between the two brands. However, for someone just starting out it’s kind of fun to play with different stitches. If your daughter is going to make any baby items and wants to use some pretty stitch around the edge, for example, she can do that with the CS6000 but not with the two Janomes you mention.
When comparing the XR9500PRW take a look at the stitch patterns between the two. The two Brother machines are very similar and the biggest differences are in the collection of stitches included with each.
Thanks so much for the compliment! I have so enjoyed working on this site. 😉
Sincerely,
Erin
Hi Erin, Thanks so much for your reply. Still can’t make up my mind and have done days and days of research. I do have it narrowed down to the Brother cs6000i or the Janome 2122. My daughter would most likely use a machine for curtains, pillows, table cloths, home décor, dabbling, etc. You say, “While it mostly comes down to flexibility vs. longevity between these two there are also some minor differences. The stitch width and length are limited to 5mm and 4mm respectively, the buttonhole on the Janome is a 4 step process instead of 1, and there are fewer included accessories.” -Which machine is limited to have 5mm or 4mm? And with regards to that, which machine would be best for stitch width/length? I am not finding a major difference in costs between these two, so for me it boils down to what would be best machine to give someone. Do I choose flexibility over longevity? Also, are you saying the Janome 4 step process is complicated compared to the Brother 1? I appreciate your patience!
Dixie, Sorry – when I mentioned the stitch width and length measurements I was referring to the Janome. It is also the machine with a 4-step buttonhole instead of the 1 step buttonhole which means doing a buttonhole is more manual with the Janome than with the Brother.
Either machine will handle the tasks you mentioned.
Without knowing your daughter, it’s hard to say whether to go with flexibility over longevity but I’ll tell you when I chose my sewing machine I hadn’t sewn in years (since junior high). I went with a Janome because of the longevity but the one thing I really wish I had was more decorative stitches. I have all boys myself but I have several nieces and I’d like to make some projects as gifts for my friends and family that would look really cute with some playful stitches on them but I don’t have them to use. I might not be anything like your daughter but I thought maybe my personal experience could help you with your decision. (Which is my subtle way of saying if I were the receiver of said sewing machine I’d love the extra stitches!) 😉
Sincerely,
Erin
don’t know if this is where I ask a question but have a brothers CS6000i and have loved using it..but today I lowered the feed dogs to do FM then when I tried to go back to regular stitching..the feed dogs are stuck down..cant get the release for them to work..any solutions for me? thank you
Viola, I’m not experienced in machine repair but I can give you a few things to check. First, turn off the machine, unplug it, plug it back in, turn it on and switch the feed dog lever to the up position. Turn the wheel manually to move the needle and see if the feed dogs come up. If that doesn’t work, remove the bobbin and check the compartment to see if there are any stuck threads that need to be extracted.
Sincerely,
Erin
Hi Erin,
Your review is very helpful. I was looking through some comments and saw you mentioned SINGER 4411 Heavy Duty Sewing Machine for heavier materials. I’m very new to sewing and don’t know how much I’ll be working with leather/denim, however I definitely have ideas for some leather bags (I’ve never worked with leather before but I love it).
This will be my first sewing machine and I definitely want to use it for pattern sewing (got few books with patterns) / alternations but I need it to be able to handle leather as well. I want it to be easy to use and sturdy, since both are in the same price point which machine would you recommend or is there any other one that might work better?
Thank you for your time!
I’m really excited to start sewing! Have some classes lined up but first have to buy a machine 🙂
I just saw there is also Singer 4423 model that has few more stitches (for only $10 more) but I wander if those heavy duty machines are good for lighter fabrics as well?
Ilona, I do think you’re going to need one of the heavy weight machines if you want to work with leather. They’re going to have the power you need top punch through not one layer of leather but two – and sometimes doubled over at certain seams. They’ll also work well on lighter materials, though, so you’ll be able to use those machines for regular patterns and the alterations work. And at the current price difference I’d certainly go for the one with more stitches! 😉
Sincerely,
Erin
what type of thread do i use for quilting on this machine?
could we use voltage transformer to convert brother cs6000i computerized sewing machine on 240V ? i m from pakistan.
thanks!
I love your site. Very informative. I’m looking for a new sewing machine and can’t decide between three different models. After reading your review on the Brother CS6000i I was going to order it from Amazon but them I saw the Brother Cx155la and Brother Dz2400. They are all $199 right now. I would be using the machine for basic mending and hemming but also for sewing baby blankets and quilts. I previously had a Brother Cs80 and I loved it.
Hello Erin!
I’ve spent hours on your site comparing machines, as I’m in the process of narrowing down choices for an upgrade. I’ve been working on a Singer that’s probably from the ’80s, and I’m ready for a change! I do light garments (mostly cotton skirts and tops), small fabric projects (purses, wallets, stuff like that) and quilting. With these in mind, I’m trying to choose between the Janome 8077 and the Brother CS6000i. The Brother has more features but I’m wondering about the throat space–which one has a larger one that will be better for quilts? Thank you so much! Really appreciate your insight!
Jay – I believe the 8077 has a larger throat space. I don’t have the exact measurements but I’ve got the Janome 7330 which is identical to the 8077. I’ve physically inspected the CS6000i (and my niece has that one) and in my opinion the Janome feels like it has an extra inch or two of throat space because the opening is square rather than rounded as it is on the CS6000i (although the machines have very similar exterior dimensions).
I’m making a note to start adding throat space to the dimensions as I gather them. I’ve just measured the throat space on the 7330 and it’s just a hair under 5 inches square.
Sincerely,
Erin
Thank you SO MUCH for getting back to me. I’m most probably going to get the 8077. Very excited–your help is invaluable!
Dear Erin,
I bought a Brother cs6000i for my very first ever sewing machine and LOVE IT!!
I do have a couple of questions about the stitches:
1.) What stitch number would I use for a straight satin stitch (for appliques) and what would I use for the settings?
2.) Can I use a twin needle for a satin stitch (I would like to use two different colors of thread).
I appreciate you taking the time to answer my questions. Thank you! 🙂
Hi Erin, can the brother CS6000i sew a leather skirt or trouser without difficulty? Am a beginner but i’ld like to advance in my sewing skills with time and does the brother CS6000i last long without the plastic inside breaking? Please I so need your help because am planning on buying my first sewing machine and am more than confused on what to buy?
Hi Erin,
I am from INDIA and not that much expert in sewing. and I would like to buy a sewing machine that is easy to use but will last for years. I searched in the internet and interested in Brother CS 6000i and Singer 7258 Stylist… But my problem is I have some doubts about the product. Can this machine be used in a Country with 220 – 240 voltage like India? It is writtenin the manual that this sewing machine is requires 120 voltage. If like that, can I operate the machine like any other item that is plugged into a converter? While I take the machine out of the country, will it void the warrantee? I have searched in the internet several times with this doubts, but didn’t get any answer yet. Can you help me please…. I really want one of the above sewing machine… If all the sign is green for me, how much each of the above machine cost in India? How can I get one?
Thank you,
Sony..