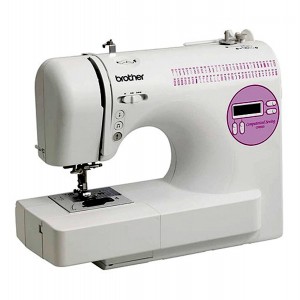
 Just a few months old and the Brother CP6500 sewing machine is making waves. Underneath it’s sleek design and pink, rounded accents it is the exact copy of one of Brother’s most popular models but priced unbelievably low.
I’d seen it around Christmas and had included it in some of the online deals at that time but hadn’t done a full review. It’s time. Here’s a thorough look at all its features and stitches and a thought about why this is a great machine for anyone who doesn’t want to spend a fortune but wants enough variety from their sewing machine to keep things interesting.
Table of Contents
(Click Ahead!)
Stitch Count / Presser Feet / Functionality / Accessories / Customer Reviews / Pros, Cons & Manual
NOTE April 9, 2015: Like the CP7500, this machine is very hard to find these days. It seems to be out of production. You can try the links below but it’s probably not in stock at either location. If you like these features, though, check out the Brother CS6000i.
REVIEW SUMMARY
MODEL: Brother CP6500 Sewing Machine
REVIEWED BY: Erin
RATING: 4.7 
LAST UPDATED: April 9, 2015
COMPARE PRICES
Amazon
Lots of Great Stitches on the Brother CP6500 Sewing Machine
(Back to Top)
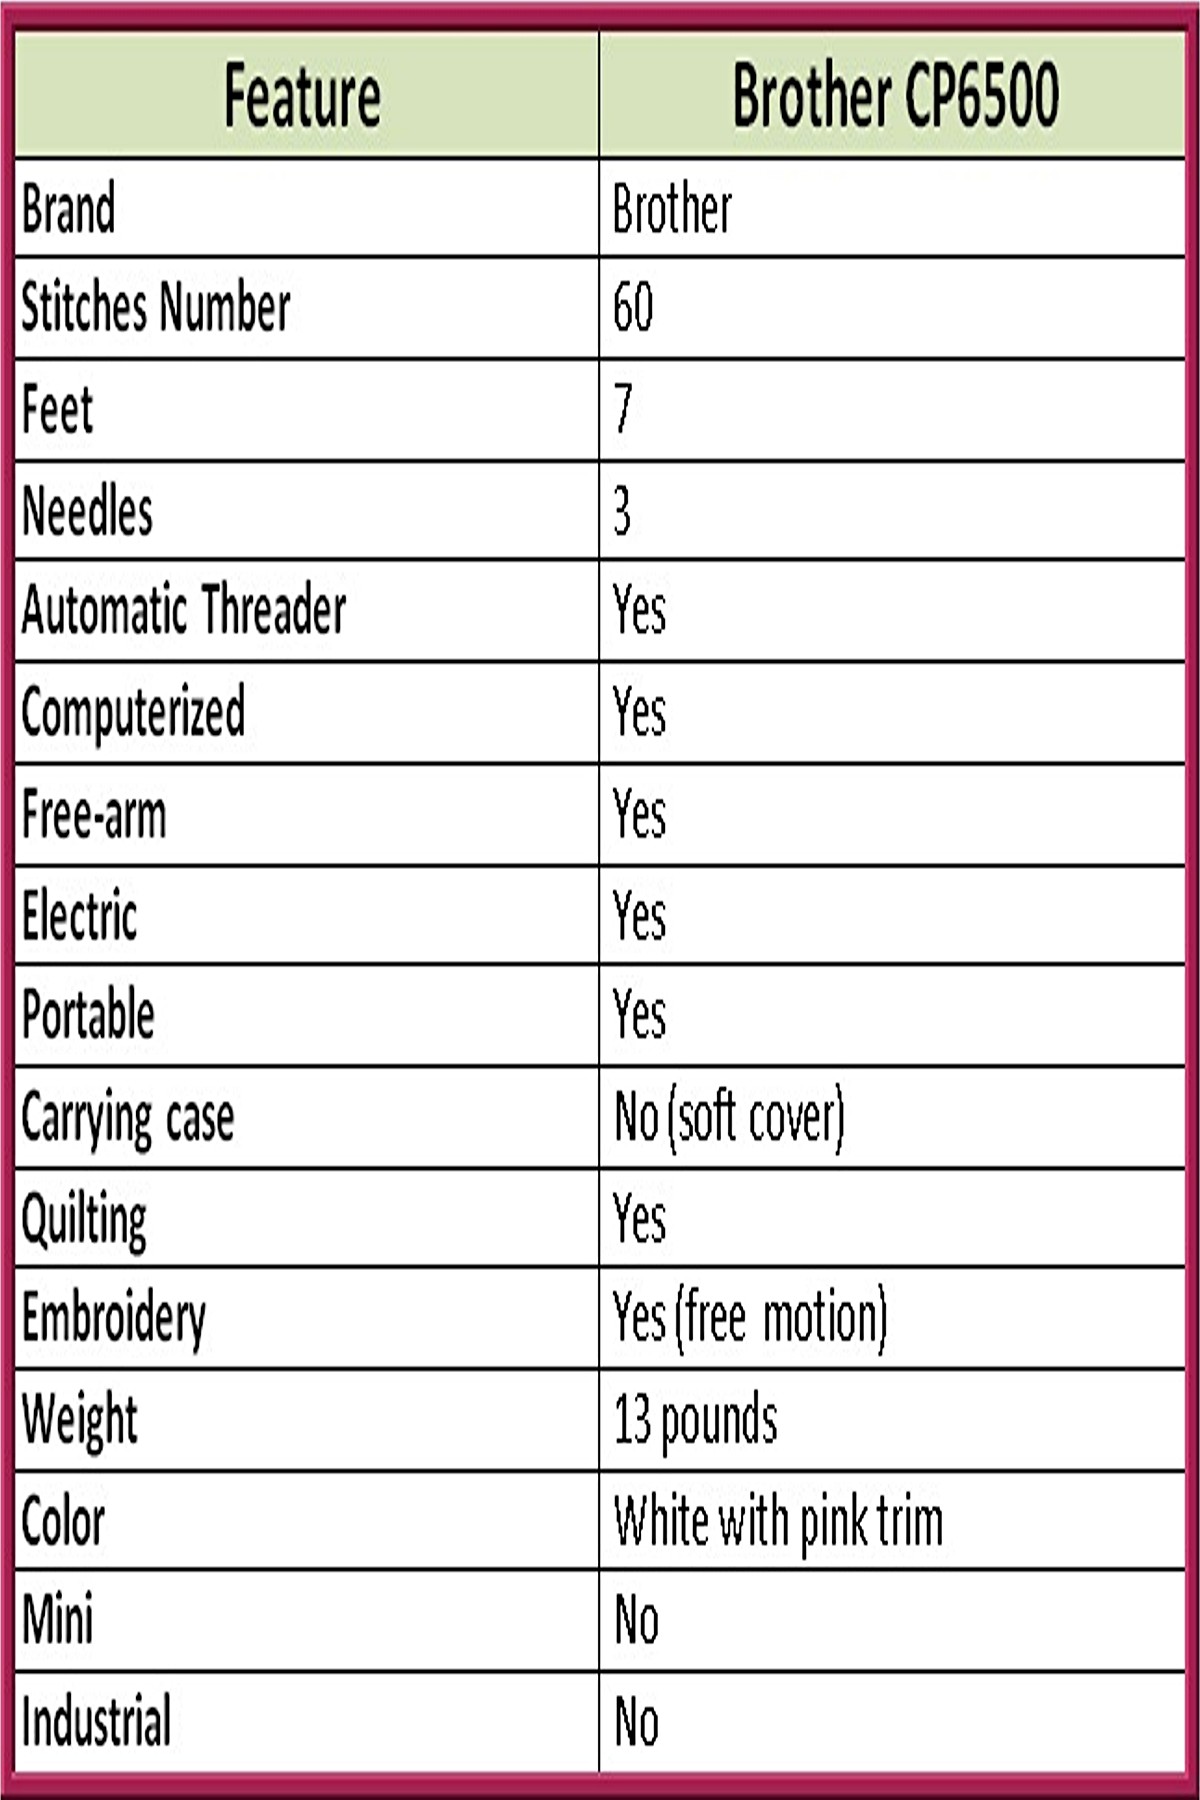
There are 60 built in sewing stitches which include 7 different styles of buttonholes. All seven are 1-step, auto-sizing buttonholes so you can produce a number of them in a matter of minutes.
The assortment of stitches can be used for lots of creative sewing. You can make clothes, curtains, drapes, costumes, pillows, tablecloths, home goods, mend jeans, quilt and even decorate your scrapbooking work with pretty stitches. There are joining, piecing, heirloom and smocking stitches for heirloom sewing so items as delicate as christening gowns and bridal veils are very doable.
Embellish the hems of collars or children’s clothing or create your own quilt designs with free-form sewing stitches. Because the feed dogs can be lowered you can do free hand embroidery, monogramming or quilting with this machine. Free hand means you guide the fabric to create the letters as there is NO font on the this model for monogramming.
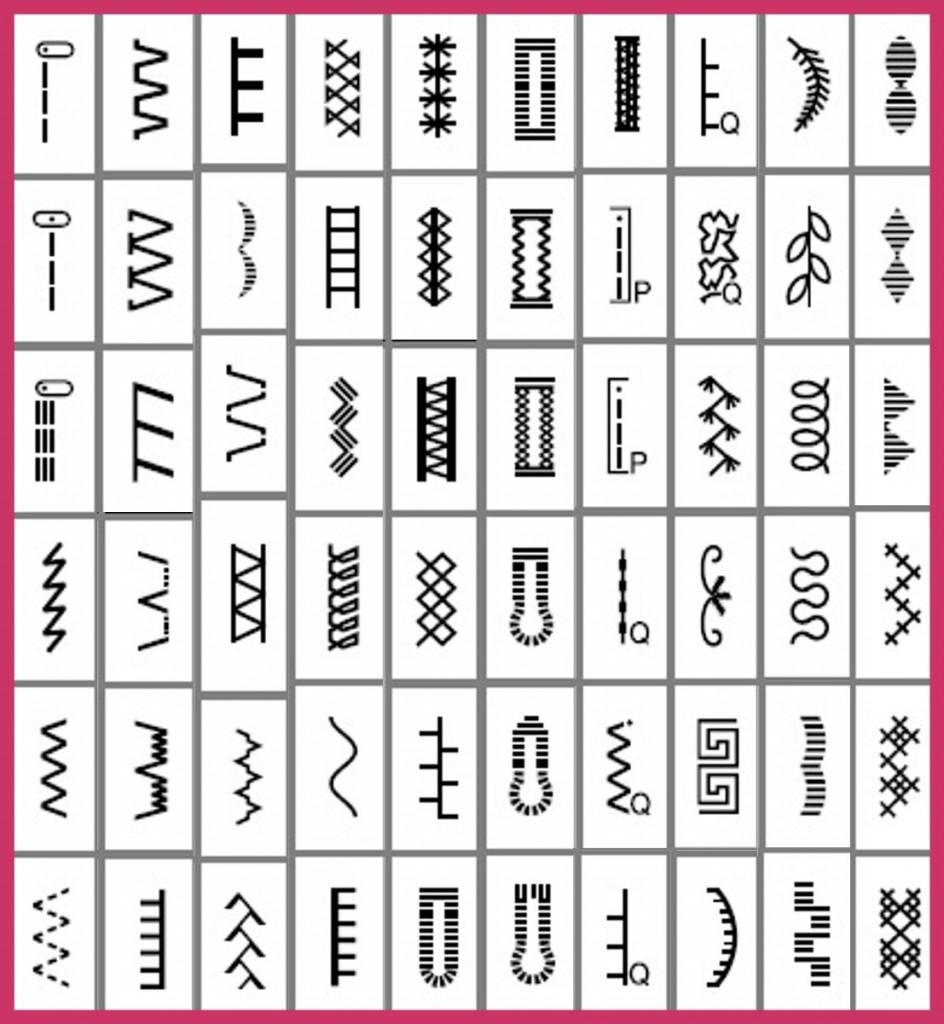
Stitch width is adjustable to 7mm and width is adjustable to 5mm for certain stitches. You can make a super wide zigzag stitch for edging or design.
The stitch reference guide sits above the control panel. On other models, Brother has positioned the stitch reference guide in unused space below the control panel. It took me a few minutes to realize the true benefit of this better layout. You can see the stitch reference guide without having to remove your hands from the control panel. When it is underneath, your hand and arm are often in the way of seeing the guide as you’re working the controls. Seems like such a simple thing but really helpful!
More than Just the Standard Set of Presser Feet
(Back to Top)
When you buy, you get 7 presser feet in the box. These include:
- Buttonhole foot
- Overcasting foot
- Monogramming
- Zipper
- Zigzag
- Blind Stitch
- Button Fitting
Presser feet are the simple, snap-on style which can be changed easily with one hand. Some listings say that this machine comes with only six presser feet but those listings are not counting the Zigzag (general purpose) presser foot which comes attached on the needle arm in the box.
The Zigzag foot has a small, black button on the back called a leveling button. If you have to climb a small hill of fabric on a thick seam or overlap, just push that button and the presser foot will level out to the highest point and continue to sew consistently through the seam without dropping stitches or getting hung up on anywhere.
The presser feet are made of a very sturdy, metal-colored plastic and white plastic.
Functionality
(Back to Top)
 This is a computerized sewing machine which means that you control the machine’s settings through push buttons and a screen which interact with a small computer component inside the machine. If you’re a beginner, don’t worry – these buttons are easy to figure out. This allows for more automation to be built in so that more time can be spent sewing and less time spent on set up or routine tasks.
Features include many of the most user friendly options:
- LCD screen
- Automatic bobbin winding
- Automatic needle threader
- Quick-set, drop-in bobbin
- 6 point feed dog
- 850 stitches per minute
- Start/Stop button
- Reverse button
- Programmable Needle Up/Down button
- Speed control slider
- Drop feed dog lever
- Free arm sewing
- Twin needle capability
- Adjustable thread tension dial
- Variable need position
- Brightly lit LED lights
- Built in carry handle
- Threading instructions printed on the machine
- Horizontal thread delivery
- Built in manual thread cutter on the left hand side
- See through bobbin cover
This machine comes with a foot pedal but you don’t have to use it. Leave it unattached and you can start and stop the needle by a press of the Start/Stop button. The speed control slider controls the sewing speed. This is a great setup for beginners, especially kids, because you can keep the machine at a low speed for easier fabric control. It’s also useful when working on complicated sewing techniques where you need to be very precise.
There are three single-button controls and a slider just above the needle arm which drive a lot of what used to be done with the hand wheel and the foot pedal:
Reverse button – Causes the machine to sew in reverse to lock stitches in place.
Start/Stop button – starts and stops the needle when the foot pedal is not attached.
Needle Up/Down button – push this to lift or lower the needle without having to use the hand wheel. The needle defaults to always stopping in the down position so your fabric doesn’t slip before you’ve finished but this default is programmable so you can change the machine to always stop with the needle in the up position if that better suits your projects.
Speed Control Slider – use this to control the sewing machine speed. Keep it on a slow setting when you’re just starting or teaching kids; speed it up when you need to fly through a bunch of straight lines.
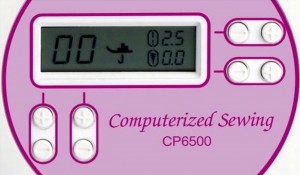
The stitch control panel consists of the LCD screen, two arrow keys below the screen, and two arrow keys to the right of the screen. The two arrow keys below are used to select the desired stitch pattern. The first button controls the first digit of the pattern number and the 2nd button controls the 2nd digit in the pattern number. The left/right arrow keys are for stitch width and length changes. The LCD screen shows selected stitch pattern, which presser foot is needed for that stitch and the current stitch width and length settings.
According to the manufacturer, the CP6500 has the same motor as the well rated Project Runway sewing machines they produce. The outside is redesigned with more round curves and different trim.
This sewing machine never needs to be oiled.
For those of you outside the US, the Brother CP6500 sewing machine is 110volt and would require an adapter.
As I mentioned, this machine mirrors another, extremely popular model. Underneath it’s cool, sleek design, it’s exactly mirrors the Brother CS6000i (read my overview here). Everything from stitches to features to strength of the feed dogs is identical – except the price. The CP6500 costs a lot less but you have to remember that it also doesn’t include the quilting accessories, hard cover case, and extra wide extension table that come with the CS6000i.
Dimensions: L 16.26″ x W 7.01″ x D 11.65′
Weight: 13 pounds
Accessories
(Back to Top)
These sewing notions and accessories are included with your purchase:
- Ball point needle
- 3 bobbins
- 3 needles (spare size 11, 1 size 14, and 1 size 16)
- Twin needle
- Disc shaped Screwdriver
- Seam ripper/cleaning brush
- 3 spool caps (small, medium, and large)
- Extra spool pin
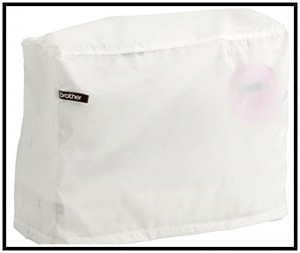
- Soft cover
Consumer Ratings are Very Strong
I’ve read through all available reviews and the comments are overwhelmingly positive. The only issue that came up at all was from two people who mentioned that the top thread seemed to come undone while sewing. Since it has only come up twice, it doesn’t seem to be a common issue with the machine.
Consistently it was mentioned that this machine runs very quietly, does an excellent job sewing through thick layers of fabric such as denim, and is great for kids, too.
Average Rating: 4.7
Pros, Cons & Manual
![]() Pros: Great set of built in stitches. Automated controls like the Start/Stop button, Needle Up/Down button and the Speed Control Slider. Nice selection of presser feet. Automatic buttonholes. Leveling button for getting through thick seams and fabrics. Twin needle included.
Pros: Great set of built in stitches. Automated controls like the Start/Stop button, Needle Up/Down button and the Speed Control Slider. Nice selection of presser feet. Automatic buttonholes. Leveling button for getting through thick seams and fabrics. Twin needle included.
![]() Cons: Pressure foot pressure is not adjustable. No hard cover included but can be purchased separately.
Cons: Pressure foot pressure is not adjustable. No hard cover included but can be purchased separately.
Manual available online here: See the Online Manual
Manufacturer’s Warranty: As of this date, Brother offers a 1 year warranty on parts and labor, a two year warranty on electronic pattern control and selection components (parts only), and a 25 year warranty on shafts and rods on the machine head.
For current pricing information, check inventory at these two stores:
COMPARE PRICES
Amazon
Features Summary Review:
First, I’d like to say that this blog is EXCELLENT!!! Thank you so much for taking the time o go through these machines and do all of the work needed to make recommendations. I am a beginner sewer. I haven’t used a machine in about 15 years. I need a machine to do home sewing projects:curtains, duvets, pillows, seat cushions and for my quilting. I was trying to stay in the $100-$200 dollar range. Is that too little money to spend on a machine for all that I need it to do?
Thank you so much for your time!
India Blow
India – Glad you like the site! *blushing* 🙂
You can easily get a sewing machine that can handle home decor projects and quilting for that price range. Take a look at the Brother CS6000i (see my page here) along with my post on the CS6000i vs the CP6500 (which you can read here) for ideas.
Most of the features on those two machines are the same but you get different accessories with each one and both cost under $200. The CS6000i is one of the most popular buys for a first sewing machine.
I went 30 years between learning to sew and getting my own sewing machine so I can tell you without a doubt you’ll find it easy to get back into it and you’ll love what today’s machines can do for you.
Let us know if you need help making your decision. 😉
Sincerely,
Erin
I wondered if any of you could tell me where I could find a better cross-reference list of embroidery thread. I have lots of Coats & Clark, little Sulky & Gutterman. Need to match numbers up with pattern colors on Brother designs. Any suggestions? By the way, simply love the auto threadcutter!! Had the stop/start before and 24 stitches on my White. New to embroidery and tackled my first design (small albeit). The only thing that takes most of the time is changing the threads. Now that I have a bigger assortment of thread, I would like to tackle more involved design, but can’t until I have thread conversion. HELP! Thanks.
Erin,
Any info on the Brother CP7500? Looks very similar to CP6500 but with quilting attachments. Any other differences?
Debra – There are just a few differences but they all have to do with stitches and accessories. The performance and controls are exactly the same. In fact, the two models even share the same user manual. 😉
The CP7500 comes with all of the same stitches as the CP6500 plus 10 additional styles which include a couple of extra cross stitches, a couple of extra satin stitches, and a few extra decorative stitches (like the cute heart stitch). Then there are the quilting accessories you noted.
Considering that today the price for the CP7500 at Walmart is only about $19 more than the CP6500, it’s quite a bargain. Great find!
Sincerely,
Erin
Erin,
Thanks for the info! I am still in a holding pattern however after viewing your review of the Singer Stylist 7258. Can you point out any major difference I should be considering? I am an older beginner, who did a little sewing as a teen. I want to make various items: light weight eye pillows to repurposed jeans for yoga bags & totes and of course standard mending. Any thoughts? (BTW LOVE your site! It is so hard to look for something like this with so many offerings out there and feel confident about your purchase.)
Thanks, Debra
Debra – Older beginner who sewed as a teen…that could be me! 😉 That Singer Stylist gets a lot of attention – all well deserved, as far as I can tell.
There are only a few differences. The Singer 7258 comes with more stitches, a slightly higher price, all the same controls that the CP6500 and CP7500 have but doesn’t include an extension table like you get with the CP7500. The two Brother models also have been on the market a little longer and have more consumer reviews – all really strong.
The Singer, however, is catching up. Looks like five reviews have been added to Amazon since I wrote this post and they’re all glowing with praise.
This really pits the models against each other based on the stitch assortment alone AND one other thing. The Brother models can use the Brother Side Cutter presser foot whereas the Singer 7258 does not list Singer’s side cutter as being a compatible accessory. The side cutter foot trims fabric off as you sew a seam, sort of like a serger. If that’s not an issue for you, then it’s just comparing the stitches to see which set you like better and, of course, the price difference.
It does get hard to choose, doesn’t it? I can see why some people collect these like shoes!
Hope this breaks it down for you a bit. 😉 BTW – LOVE your project ideas. How fun!
Sincerely,
Erin
Erin,
Buying today but one more question: Bobbin winding on the CP7500 seams tedious to me. Looks much easier on the 7258 as it stops filling automatically. I will admit to getting frustrated with bobbins in the past. Any thoughts? Also, it appears CP7500 has only 3 needle positions compared to 13 for the 7258. Should this be a major concern. The accessories are great on the CP7500 but as I’m starting anew I want the most user friendly version so as not to get so discouraged that I throw in the towel rather than sew it!
Thanks again for your wisdom,
Debra
Debra – The bobbin winding on the two machines is similar although the CP7500 slows down as the signal that the bobbin is full and the 7258 stops completely. As a fellow bobbin-sufferer, I think you’ll find both are much easier to work with than those you may have dealt with in the past so I wouldn’t let that be your deciding factor. 😉
The 7258 does have more needle positions and this can help if you’re going to be inserting lots of different kinds of zippers (invisible seams and such), lots of cording or other small trim work and with some kinds of quilting work where you need to be very precise about where the needle is going to come down next.
Both of them have similar controls and ratings that I think you’re chances of being discouraged are minimal. My mother has sewn for most of her life and when it was time for me to take home ec in junior high (a LONG time ago…) I thought for sure I’d love it and my mother and I would be working on projects together and fighting for time on her machine. A couple of nasty bobbin instances, a dress I made and NEVER wore, and lots of little frustrations later and I didn’t sew again for almost 30 years. Today’s machines, though, really are designed to take away so much of that frustration that sewing seems much more exciting to me now. I’m hoping you’ll have the same experience. 😉
Sincerely,
Erin
Hello Erin,
I’m glad I found your site. I’m looking into getting a new sewing machine – I only have an old Kenmore one that I got from a yard sale about 8 years ago, but it’s giving me grief a lot lately that I’ve started avoiding to sew (not to mention having young children, which means not much time to sew). I’m eyeing 2 sewing machines, but can’t decide which one is better – Brother CP-7500 and CS6000i.
CS6000i’s original price is higher than the CP-7500, but its sale price (at Amazon) is lower than the other. I’m not sure if a higher original price indicates better quality. Would you be able to tell me which one you’d go for, which is a better quality, or has better value?
I’m considered a beginner-intermediate sewer, having sewn some PJs, some craft items, and attempting to make bags.
Thank you so much for your help (and time!)
Julie
Julie – the functionality and design of these two machines is similar enough that I would not classify one as being of better quality than the other. I’ve spent some time comparing the CS6000i, the CP-6500, and the CP-7500 and I can tell you that since the CP-6500 is exactly the same as the CS6000i and the CP-7500 is just another version of the CP-6500, you can focus on stitch assortment, accessories and price when comparing these machines.
Since you mentioned the CP-7500 specifically, I’ll leave the CP-6500 out of the equation and compare just the CS6000i to the 7500 for these 3 factors:
Stitch assortment: The CP-7500 has 10 more stitches and those additional stitches are all decorative so you’ll have the same set of utility stitches and stretch stitches in either machine.
Accessories: The CS6000i and the CP-7500 both come with the same presser feet, an extension table, a hard cover and the same sewing notions.
Price: Today, the two machines are about $5-6 apart – Today’s Amazon Price on the CS6000i and Today’s Amazon Price on the CP-7500. (You can save a $1 at Walmart but having to pay for shipping eats up any difference…)
For an extra $6 for the additional stitches, I’d go with the CP-7500 because the one thing I wish my own machine had was more stitches. 😉
Sincerely,
Erin
Hi Erin,
Thanks so much for the wonderful explanation. I just purchased a CP-7500 online and am very much looking forward to receiving my new toy! Thanks again and more power to your website!
Kind regards,
Julie
Julie – Thanks for the compliment (and the additional power….ALWAYS in short supply!) 😉
This looks like a great machine. I am a beginner looking to sew denim jumpers. Will this machine handle the denim well? thank you! Beth
Beth – Yes, the Brother CP6500 handles denim just fine. Make sure to use the right needle (size 90/14 and 100/16) for the weight and type of fabric. (The needle size information and fabric chart can be found in the manual.) Sounds like a fun project!
Sincerely,
Erin
What is the main difference between Brother CP6500 and Brother CE5500PRW? They are both $149 at Walmart. Thanks for your help. And your website is awesome! So glad I found it since searching and getting confused with so much information about buying a sewing machine for an absolute beginner!
Annemarie – Exactly the reason this site exists. My mother, who has sewn for longer than I’ve been alive, became so frustrated shopping for a new sewing machine for the young girls in our family that she suggested I start this site. I’m glad you found it helpful!
Although both the Brother CP6500 and the CE5500PRW are the same price, there are a few differences that favor the CP6500. First, the CP6500 has 10 more stitches – including the popular stippling stitch for quilting which the CE5500PRW does not have.
The CP6500 has speed control and a start/stop button which means you can sew just with button controls and no foot pedal when necessary. The speed control function is great for keeping the machine from speeding up at just the wrong moment – like on a delicate line of work that will show on your project or when following a curving line.
There is also a weight difference with the CP6500 weighing just a few more pounds.
Other than that, they’re very similar but the additional controls and stitches on the CP6500 make it the better deal.
Sincerely,
Erin
I was looking for a sewing machine and was set on the 6000i and thanks to your review I came across this model. I have it for a few months now and I LOVE it. it is very easy to handle and sews smoothly. Thank you!
Can you tell me if the Brother CP6500 can be set into an old time sewing table? Does it have holes in the bottom so it can be secured?
Hi Erin,
Thank-you so much for this site. I’m a beginner and was wondering if you could tell me which machine would be better for sewing stretch fabrics: Brother CP500 or Singer Stylist 7258? The Singer advertises it’s stretch stitches.
Also, do you have an opinion on the Brother CE8080?
Hi Erin,
What a fabulous site! So much good info and comparisons. I notice that on your site and Brother, they say the CP6500 has automatic thread cutter. I am confused because I bought the machine and nowhere did I see the little scissor button. Instead, there is the manual cutter at the back where you have to pull the thread through. Am I missing something? I could be, first machine I ever owned and never sewed before. Thanks for your help in advance. Your site also helped me decide to buy the CP7500 and box up and return the 6500. You should point out the walking foot more for beginners like myself, because I had no idea that for an extra $30 I was getting $150 plus value with the quilting and walking foot plus the extension table just by getting the CP7500 over the 6500. I bought at Costco in Canada and paid $194++ for the CP6500. The CP7500 was an extra $50 but the extras would run me at least $200 so definitely worth it. Thanks so much for this site, you are an angel. keep up the good work.
Hi Erin,
I am an intermediate sewer and mostly make clothes. I am trying to decide whether to buy the Janome DC 2014 or the DC 2015. The DC 2015 does not appear to have the Superior Feed System. It has the 7 piece feed dog. Do you think the SFS is important enough that I should buy the DC 2014? In addition to more stitches, it appears the DC 2015 has a start/stop button and an adjustable pressure foot. (I am also looking at the Magnolia 7360.) I’d really appreciate your thoughts.
Thank you!